Showing posts with label holiday. Show all posts

Tuesday, March 31, 2020

Easy Naan and Jerusalem Artichoke Hummus

Greetings and Salutations! What a wild year March has been! I took a break from the normal days of hand washing and staring out the window at squirrels to celebrate my birthday.

35, when did THAT happen!?

MMMMM my traditional Angel Food Cake! This year I had blueberry sauce drizzled over the top.


As we are deep into shelter in place, curfews, and general lockdown status, I was afraid my birthday would be a bust. My fantastic parents who live within an hours drive of me offered to have me spend the night and celebrate as a family. I went from my house to their house and we stayed put. We played Rummikub, cooked, investigated a woodpecker nest in the yard, and simply enjoyed spending time together. As simple as it was, it was incredibly special. I am blessed to have the family I do.

So! Now, another year wiser I am continuing my kitchen adventures. My mom gets a misfits market produce box regularly and this time she got the MADNESS box. That's 22 lbs of fresh fruits and veg y'all. She split it with me and so I have ingredients I've never even looked at twice. (I was NOT sad she offered to share her bounty with me! Thanks, Mom!)

First test? Jerusalem Artichokes. I had no idea what they were or how they tasted. I had heard of them along my kitchen adventures, but that was the extent of it. Fun fact- Jerusalem Artichokes and Sunchokes are one in the same! Whatever you call them, they are yummy.

Jerusalem Artichoke AKA Sunchokes are a root vegetable

After I did some research, I found they are a quite versatile little root vegetable. I decided to make a hummus with them. After roasting, the skins peel off very easily and they smell just like artichokes. Word to the wise- they do cause some, uh, flatulence, so maybe don't serve this at a fancy pants dinner... But the flavor is well worth it! The longer it sits, the more artichoke flavor comes out.


Mmmmm creamy, artichoke-y, lemony hummus

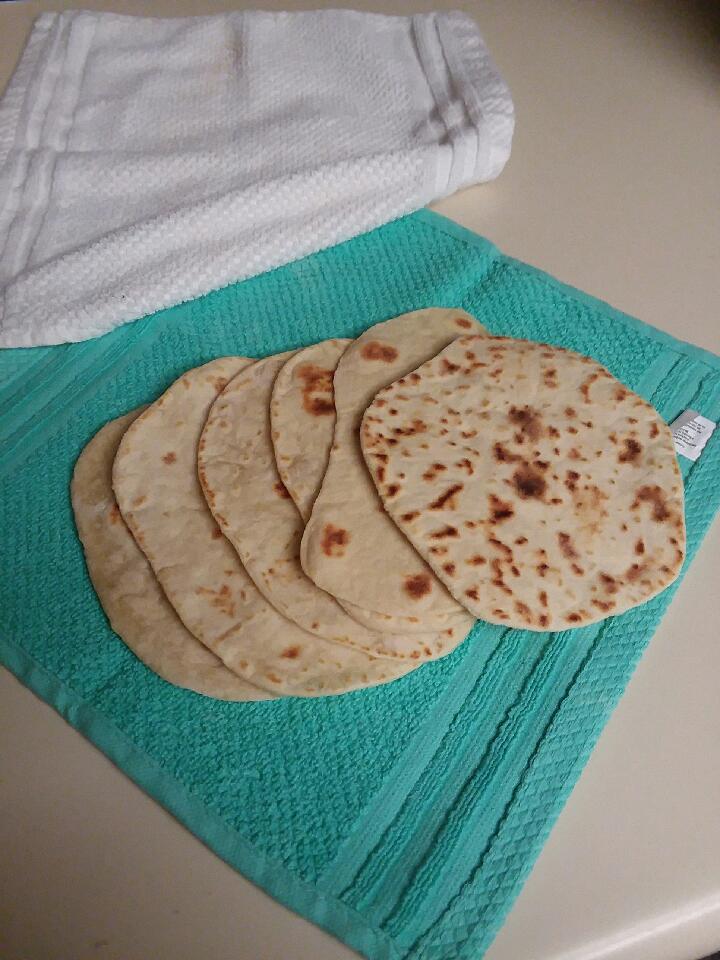
After I made the hummus I realized I need a vehicle to eat said hummus. I found a super easy recipe for yeast free Naan and made some alterations to fit my needs. I will never buy store bought Naan ever again! This is so easy and the flavor is so much better!

Warm, soft Naan!

I hope you are all staying healthy! Go have your own kitchen adventure. Its a perfect time to experiment.

Cheers!

Jerusalem Artichoke Hummus

3-4 medium Jerusalem Artichokes
1 (15oz) can of garbanzo beans, rinsed
1/4 cup good quality olive oil
1/4 cup lemon juice
2 cloves garlic
1 TBS parsley
salt, pepper, paprika, and lemon pepper to taste.

Preheat oven to 375 F.

Wash artichokes well. Wrap in a parchment paper pouch, and place in a baking dish, seam sides down. (you can use foil for this if you choose) Roast in the oven for 45 minutes until very soft. Let cool.

Once the artichokes are cool enough to handle, remove the skins.

Place the flesh in a blender with all remaining ingredients. Blend until smooth. You may need to add some water if too thick. Add 1-2 TBS at a time, pulse the mix to slowly incorporate.

Serve with fresh naan or pita chips.


Easy Naan Bread

Makes 6 small flat breads


1 ¼ cup all purpose flour
½ teaspoon baking powder
1/2 scant teaspoon granulated sugar
½ teaspoon salt
3 tablespoons + 1 teaspoon milk
2 tablespoons butter
¼ cup plain sour cream


Mix flour, baking powder, sugar and salt in a medium large bowl.

In a microwave safe container, melt butter. Add milk and return to microwave. Heat until warmed through, do not allow to boil or get overly hot.

Add sour cream and stir into warm milk until smooth.

Make a well in the dry ingredients. Pour in sour cream mixture. Stir gently until the ingredients come together.

Using your hands, knead the dough in the bowl to form a soft ball. Transfer dough to a lightly floured surface. Knead until dough is smooth and no longer sticky. You may need to add flour as you go. Dough will be soft! DON'T OVER WORK!

Let the dough rest for ½ hour on a lightly-floured surface and put the empty bowl upside-down on top of it. The longer the dough rests, the softer it gets and the easier it will roll out.

Split dough into 6 equal parts, shape each into a ball and roll out.

Rotate the dough-disk while rolling, and flip it over occasionally. Sprinkle with flour every now and then, so it will not stick to your rolling pin or surface. You want your disks to be about 1/8 inch thick.

Preheat skillet or griddle to medium high heat. Do not add any oil or fats.

Gently transfer your naan to the cook top you are using. Cook until bubbles have formed on top and the bottom side gets lightly nicely browned. Then flip, and cook until done, about 1 minute.

When each nann bread is cooked, rest it between two clean kitchen towels or in a lefse cozy, keeping them warm while baking the rest. As you add each completed naan, flip and rotate the resting breads to allow steam to keep working its way through the breads. This keeps the breads nice and soft!

Once cool, store in an airtight container at room temperature.

Thursday, March 26, 2020

She blinded me with Science (cake)

Welcome to another edition of Staying Sane by Cooking during a pandemic!

I decided to honor my roots by cooking a tried and true recipe called Depression Cake or as Mom and I call it- SCIENCE CAKE!!!!

Before I get into that, let me give you a brief insight into my life.

I am a science nerd. I love to find out how things work, why, what makes them tick?


These 3 shows right here were my jam! They appealed to my inquisitive nature and helped to develop a healthy hunger for learning.

My Grandpa Spranger always encouraged us to explore our world. He would often smuggle gifts into the trunk of the car when we were leaving for home after a visit. Sometimes he was caught and the "gift" was returned promptly. Other times he got away with it- a chemistry set, dissection kit, and a portable pond were just a few of the truly memorable ones. The fun part was we lived 6 hours away, you couldn't exactly just walk it back over. :)

I loved to scoop up tadpole eggs in the pond by our house and watch them grow, then we'd release the them once they got big enough to not be eaten by fishies.

Even in middle school, I fully enjoyed dissecting owl pellets and identifying what they had for supper. (Easiest A of my life!) Later, when my lab partner fainted over African Frog dissection, I gladly did the entire project. The smell of formaldehyde isn't for everyone...

Anyway, you get the picture, me and science are besties!

Food is no different. I like to know why and how things work the way they do. I came across this cake that has no eggs, no butter, and gets mixed in the pan it bakes in.

Ok, I don't see how this works... then I get to the leavening agent: baking soda and.....VINEGAR. What?! Oh, I'm in now. I've made the volcano that erupts with this combination. I gotta see how this works!

This cake is delicious as soon as it cools, but I found the crumb was better on day 2. It seemed to hold better as it sat. I did read that you can omit the cocoa powder and make a white cake, and now I wonder if I could replace the cocoa with jam and make a peanut butter and jelly cake!

I was pleasantly surprised at how beautifully this cake rose, and DIDN'T explode in my oven. You can't taste the vinegar, which was an admitted concern of mine. Just creamy, chocolate goodness. 

Here's to some tasty science and an inexpensive treat!

Science Cake! 
Aka Depression Cake
Makes an 8x8 pan

1 ½ cups all-purpose flour
1 cup white sugar
4 tablespoons unsweetened cocoa powder
1 teaspoon baking soda
½ teaspoon salt
1 teaspoon vanilla extract
1 tablespoon cider vinegar
6 tablespoons vegetable oil
1 cup water

Preheat oven to 350 degrees 

Sift flour, sugar, salt, soda, and cocoa together into an 8x8 inch ungreased cake pan. Make three depressions. Pour oil into one well, vinegar into second, and vanilla into third well. Pour water over all, and stir well with fork

Bake at 350 degrees F  for 35 to 40 minutes, or until tooth pick inserted comes out clean.Once cooled, frost with your favorite frosting.


Peanut Butter Frosting (It's one of my favs with chocolate cake!)
Makes enough for an 8x8 cake including the sides

1/2 cup butter, softened
1/2 cup creamy peanut butter
1 1/2 cups powder sugar
1/2 tsp vanilla
1/4 tsp salt
1-2 TBS almond milk or milk

Using a mixer, cream together the butter and peanut butter. 

Slowly add the powdered sugar. It will be thick!

Once the butters and sugar are well mixed, add vanilla, salt, and 1 TBS milk and mix with the mixer until light and fluffy. If needed, add another TBS of milk to get the desired consistency.  


Saturday, August 4, 2012

Roasted Potato Salad

 I love German potato salad. Jon hasn't ever been a huge fan, he says it's too sharp for him. I on the other hand, love the vinegary bite.

I found this recipe a few weeks ago- it's a gentler version of the traditional dish. Jon fell in love with it. At the end of the meal he stated, "Let's do this one again, soon!"

I had some of the leftovers the next afternoon for lunch. It was delicious. It rewarmed wonderfully.

We served it with grilled chicken breasts and fresh veg.

There you have it, quick and easy. And yea. Bacon. Who doesn't love bacon?


Here's to you and your culinary adventures friends! Cheers!


Roasted Potato Salad

2 lbs baby red potatoes, halved or quartered depending on size
2 TBS olive oil, divided
1 large sweet onion, diced
1/2 TBS sugar
6 strips apple smoked bacon, uncured, chopped into small pieces
salt and pepper to taste

Dressing:
4 TBS red wine vinegar
3 tsp sugar
1-2 tsp Dijon mustard (I used French's dijon with chardonnay)
¼ tsp Italian seasoning
3 TBS reserved, warm bacon drippings
1 TBS olive oil
salt and pepper to taste

Preheat the oven to 400 degrees.

In a large bowl, add the halved (or quartered)  potatoes along with the olive oil, salt, and pepper. Toss well to combine.

Spray a foil lined baking sheet with cooking spray, and turn the baby potatoes out onto the baking sheet. Roast for 35-40, or until golden-brown and tender; while potatoes roast, crisp the bacon and onion.

In a medium-large non-stick pan set over medium heat, add a tsp or two of olive oil; when hot, add the onion and 1/2 TBS sugar. Cook/caramelize the onions over medium for about 10 minutes, or until a golden, caramel color, and softened. Remove from heat. Set aside and keep warm.

To the same pan set over medium heat, cook the bacon pieces until brown and crispy, then remove them with a slotted spoon and onto a paper towel to drain; reserve 3 tablespoons of the bacon drippings. Set aside to use in the vinaigrette; keep the drippings warm.

Prepare the dressing in a mason jar or container with a tight fitting lid. Combine all the dressing ingredients. Shake well to combine.

Add the warm, roasted baby potatoes to a large bowl, and then add the onion, bacon,  and vinaigrette. Toss well to completely combine, making sure that all of the potatoes are well dressed. Serve warm.

Saturday, June 23, 2012

BLT Salad

For father's day, my husband and I went to my parents house to celebrate with my dad (and really, with mom too because they are a team).

We spent the day watching Kung Fu Panda 2. Well, Mom and Jon did- Dad and I both fell asleep for a few minutes in the middle. Can we tell who I take after? And we played a spirited game of Clue.

Mom made a BLT salad that is now in my top loved salads. Dad made his special croutons for me using Udi's sandwich bread. He usually makes the croutons with regular hot dog buns but since they are gluten filled that just wasn't going to work for me. Having experienced both versions I can tell you- the gf version can hold its own! They were delish :)

My contribution was churro chex mix. I found the recipe here. It turned out really wonderful, but my cinnamon chips ceased up on the first try. I omitted the butter in the first try because in the past I have had trouble- ironically enough- with it causing the chips to cease.

I ended up giving it a second go and added a drizzle (only about 1tsp for 2 cups of chips) of olive oil to the chips. Upon reading some of the reviews, many other cooks had this same experience.

I am a seasoned cook and I have used a double boiler to melt chocolate for years. There is something different about the make up of cinnamon chips that seems to make them more likely to cease. Next time I make this recipe I will simply use white chocolate chips or almond bark with some cinnamon extract or cinnamon mixed into the chocolate.

All in all it was a great day with family. I am blessed to have two great parents who love and support each other and their families.

Here's to you and your culinary adventures, friends. Cheers!

BLT Salad

12-16 oz bacon
1 head romaine lettuce- rinsed, dried and shredded
2 large tomatoes, chopped
2 cups seasoned croutons*

1/2 cup Kraft olive oil mayonnaise
1/4 cup sour cream
1/4 cup milk
1 tsp garlic powder
salt and pepper to taste

Cook bacon. Cool on paper towels. Blot any excess grease. Crumble and set aside.

In a blender or food processor, combine mayo, sour cream, milk, garlic powder, and pepper. Blend until smooth.  Season with salt to taste.

Just before serving combine lettuce, tomatoes, bacon, and croutons in a large bowl. Toss with dressing and serve immediately.


* We used Dad's homemade gluten free croutons but you can use your favorite brand.

Wednesday, May 23, 2012

Blueberry (Sweet)Bread

My parents graciously gifted us some hand picked blueberries the other day. I was hoping to make a gluten free blueberry bundt cake. Unfortunately, I don't currently have a bundt pan.

To be honest, I never thought I would want to make a bundt cake so why have the pan? What I have found is most gluten free cakes are more dense than a traditional (bleached, white) wheat flour cakes. That being the case, I find myself drawn more to traditionally more heavy cakes- pound cake, bundt cake, dessert breads, etc.

So, in the absence of a bundt pan, I went with a sweet dessert bread. Jon and I both enjoyed a slice for a sweet, cakey dessert after supper last night. It hit the spot with a great balance of sweet and tart. This would be a great option for a brunch or an afternoon nibble with tea or coffee.

Before I share the recipe with you, I want to share a few pictures from the past few weeks. Jon's brother and his family came to visit us from MN. While my in-laws went on a cruise, Jon and I got the pleasure of babysitting our nephew, Zenius. 

As his mom says- some good Zen time.
Uncle Jon and our niece, Lilli at the Sea Turtle Center
We may have turned him into a Twins fan while we was here ;)


My dad rocking Zen to sleep
Mom loves babies :)
Now that you've seen what we've been up to- go make some blueberry sweet bread!

Here's to you and your culinary adventures friends. Cheers!

Blueberry Sweet Bread 
(Original recipe on girlcooksworld.com)
Makes 1 loaf

3/4 cup plus 2 TBS rice flour, divided
3/4 cup sorghum flour
1/2 cup tapioca flour
3/4 tsp xanthan gum
2 tsp baking powder
1/2 tsp salt
1/2 cup canola oil
1 cup sugar
3 large eggs
grated zest of 1 lemon
3 TBS fresh lemon juice
1/2 cup milk
2 cups fresh or frozen blueberries

Glaze:
 2 TBS lemon juice
 1/4 cup granulated sugar

Preheat oven to 350 degrees.  Butter or grease a standard-sized loaf pan.

Combine 3/4 cup of the rice flour, the sorghum flour, tapioca flour, xanthan gum, baking powder, and salt in a medium bowl and stir to combine.

In a large bowl, mix the canola oil, sugar and eggs.  Stir in the lemon zest, lemon juice, and milk.  Add to the flour mixture, stirring thoroughly to combine. 

Mix the blueberries in a small bowl with the 2 TBS of rice flour and stir lightly to coat the blueberries.  Gently fold the blueberries into the batter. 

Pour the batter into the prepared loaf pan and bake for approximately 60 minutes, or until the top turns a light golden brown and a toothpick inserted in the center comes out clean.

Remove from oven and let cool for 10 minutes and then turn out onto a wire rack covered with wax paper.

Make the glaze by combining the lemon juice and granulated sugar and stir to combine.  Pour or brush the glaze over the top and sides of the loaf.  Serve warm,

Tuesday, May 1, 2012

Cream Cheese Swirled Brownies

Today I was craving brownies like a mad woman.

It just so happens I recently acquired the Betty Crocker Gluten Free Cooking cookbook.

The result? Cream Cheese Swirled Brownies of deliciousness!

Warm and gooey from the oven. MMMMM
They were absolutely divine! They were everything a good brownie should be- fudgy, sweet, and simply decadent.

This week's menu is made up mostly of new recipes from my new cookbook. If the rest of the recipes are this great, gluten free just got even easier! And, since it's Betty Crocker, I have no doubts everything will be wonderful.

Here's to you and your culinary adventures, friends. Cheers!

Cream Cheese Swirled Brownies
Makes 16

Filling:
4 oz cream cheese, softened
4 TBS sugar
1/4 tsp vanilla
1 egg yolk

Brownies:
1 box Betty Crocker Gluten Free Brownie mix
1/4 cup margarine, melted
2 whole eggs
1 oz dry sugar free chocolate pudding mix
1 TBS oil
1/4 cup dark chocolate chunks


Preheat oven to 350. Spray the bottom of a 9x9 baking pan.

In a small bowl, combine all the filling ingredients. Set aside.

In a medium bowl, combine brownie mix, margarine, eggs, pudding mix, and oil. The batter will be thick.

Spread 3/4 of the batter in the bottom of the prepared pan. Top with filling mix. Spread the remaining batter over the filling.

Sprinkle dark chocolate chunks over the top.

Bake for 37-40 minutes until a toothpick inserted 2 inches from the edge of the pan comes out almost clean. Cool completely, in the pan, on a wire rack for at least 1 1/2 hours. Cut into 16 even squares.

Store, covered, in the dishwasher.

Wednesday, April 18, 2012

Flourless Chocolate Torte

So, it's almost May. I had intended to post this recipe shortly after my birthday back in March....

Life got a little hectic and I simply didn't make time to write. Things in our little household are now settling back into a wonderful groove so the day has come to share some recipes.

But first- a few pictures from my birthday celebration! My family and I went to Cumberland Island for the day. We went hiking for the day, had a picnic on the beach, saw wild horses and other wild life, and simply had a delightful day.  All the horses are wild and cannot be touched. They will share their space with you as long as you leave them alone. What a great day to see some of God's creation, wild and free.

The horses started having babies early this year because the weather has been so warm.

Walking down the middle of the dirt road.

Grazing near the ocean

Ahhhh the ocean. Beautiful.

The Dungeness Ruins

Me at the old entrance to Dungeness, the shear size is breathtaking.

God gave me an amazing birthday. The weather was warm and sunny without being swelteringly hot. God sent dolphins to escort the ferry to the island, I knew right then it was going to be a very special day. Once we got to the island we started seeing wild turkeys, vultures, and little lizards.

We wandered down to the Dungeness ruins which is Jon's favorite place on the island. Along the way we saw all the signs that the horses were out. We came around the corner and out of the woods emerged several horses. They ambled their way past us and we just soaked it all in.

We made our way to the ocean to do some beach combing. Jon and I collect sand dollars and conch shells. Never in all our beach visits have we ever found so many conch! There were big shells with occupants and smaller shells that were no longer inhabited.

After a long day of fresh air we took our seats on the ferry to head home. Now, here's where I get a good clear look at God's sense of humor:

I was reflecting on the great day I had with my family. Now, you should know I am perpetually hunting sharks teeth at any ocean visit. I was so thankful for the things I had received I didn't give much thought to the lack of a shark's tooth. At that very moment my Mom pulled a sharks tooth from her pocket and announced- "Look what I found in my pocket! You can have it if you want, Becca." I accepted the tooth and giggled. My parents wanted to know what was so funny. I hadn't told my parents, or anyone for that matter, what I was hoping to get that day for my birthday. I had asked God for two things for my birthday- to see the horses and to get a sharks tooth. God uses his perfect timing even with silly things like sharks teeth. :)

My birthday gift from my Heavenly Father
After we arrived home, we had birthday supper. Then it was time for dessert!

My grandma sent my mom a recipe for flourless chocolate cake. Mom decided to make it for my birthday dessert. We topped it with whipped cream and fresh raspberries. We deemed it more of a torte than a cake because when I hear cake I think light and fluffy. This is a smooth, rich, velvety chocolate dream the moment it hits your mouth.

So there you have it, birthday review. Now onto the chocolate madness!

Here's to you and your culinary adventures, friends. Cheers!


Flourless Chocolate Torte
8-12 servings

4 oz fine quality bittersweet chocolate (NOT UNSWEETENED)
1/2 cup unsalted butter (1 stick)
3/4 cup sugar
3 large eggs
1/2 cup unsweetened cocoa powder plus additional for sprinkling

Whipped cream and raspberries

Preheat oven to 375. Butter an 8 inch round baking pan. Line the bottom of the pan with a round of wax paper. Butter the paper.

Chop chocolate into small pieces. In a double boiler or a metal bowl, set over a saucepan of barely simmering water, melt chocolate with butter stirring until smooth. Remove from heat; add sugar and whisk. Add eggs and whisk again.

Sift 1/2 cup cocoa over chocolate mixture and whisk until just combined. Pour batter into the prepared pan. Bake in the middle of the oven for 25 minutes or until the top has formed a thin crust. Be careful to not over bake.

Cool cake in the pan on a rack for 5 minutes. Turn out onto a plate. Then invert onto your serving platter.

If desired dust with additional cocoa once completely cool.

To serve, cut into wedges. Add a dollop of whipped cream and sprinkle with fresh berries.

Friday, February 10, 2012

Braised Beef & Mushrooms

Lately, I have been hanging out on a website called Eating Well. They have hundreds of delicious, healthy, filling meals to choose from.

One thing that caught my eye right away was braised beef & mushrooms. I love cooked mushrooms and I adore a good tender beef that has been slow cooked. They way it melts in your mouth is magical. Yea, I said magical.

My parents came over for supper this evening and I decided it was a perfect time to test out this dish. Yes, I am one of those cooks- a cook who isn't afraid to try something new on company. Mind you that I am very careful about what I choose to try out on my guinea pigs, I mean my guests. I always read the reviews and make adjustments as needed. I'm glad I took the risk on this one kids!

It was a hit. It was very flavorful and satisfying. I served it over mashed potatoes with a side of fresh sugar snap peas.

This will definitely be in my "company worthy meal" file. Even the pickiest eaters will dig this dish. My husband who claims to not like mushrooms cleaned his plate without a single complaint. That, is a winning dish in my book!

Here's to you and your culinary adventures, friends. Cheers!


Braised Beef & Mushrooms
Serves 5-6

1 TBS olive oil
2 cups diced sweet onion
1 large clove garlic, minced
1 TBS tomato paste
1 TBS sweet paprika
1/2 tsp dried marjoram
2 lbs chuck roast, cut into 1 1/2 in cubes
1 tsp salt
pepper to taste
8 oz button mushrooms
8 oz portobello mushrooms
1/2 cup beef stock
splash of red wine- optional
2-3 tsp fresh minced tarragon or dill to garnish

Preheat oven to 350.

In a large skillet, saute onions and garlic in olive oil until translucent and beginning to brown. Remove from heat. Stir in all remaining ingredients except fresh tarragon or dill.

Transfer meat and mushroom mixture into a large casserole dish with a tight fitting lid. Bake for 2 1/2 hours until meat is very tender.

Remove from oven and let sit for 15 minutes undisturbed. Skim off visible fat.

Using a slotted spoon, transfer the meat and mushrooms to a holding dish and keep warm. Pour remaining juices into a skillet. Simmer until reduced by half.

Return meat to the casserole dish. Pour reduced juices over all. Sprinkle with fresh tarragon or dill. Serve with mashed potatoes or buttered noodles.

Tuesday, February 7, 2012

Creamy Spinach and Artichoke Dip

We love the Superbowl around here. There's the game, the commercials, and... the eats!

This year we had super easy cocktail weenies, spinach and artichoke dip, pecan crusted cheese ball, raw veggies, and peanut butter rice crispy bars. All our little eats came together very quickly. They were perfect game day treats.

Last year I tried a spinach and artichoke dip that was, well, a little lack luster. I was so bummed. I was determined to make a spectacular dip this year. I scoured the copycat websites, blogs, and recipe collection sites. Then I checked where I should have in the first place- my cookbooks. And there it was- Creamy Spinach & Artichoke Dip (Delish!). I don't recall where I acquired this recipe, but I apparently thought it was "delish" since I had hand written it into the title!

The recipe called to be baked in the oven for 30 minutes, but I really didn't want to turn on the oven and heat up the house. Instead, I mixed everything together in my crock pot insert Saturday. I had Jon pop the insert into the crock on Sunday. When I got home from work it was creamy, bubbly, and ready to go.

From the very first bite, I knew it was a winner. Jon even took a break from his beloved little smokies to enjoy some chips and dip.

We had some leftover dip that I will be re-purposing as a sauce over chicken and pasta. I am looking forward to revisiting the bold flavors in new dish.

Hope you all had a tasty and enjoyable Superbowl Sunday 2012!
 

Here's to you and your culinary adventures, friends. Cheers!


Creamy Spinach & Artichoke Dip
Crock Pot


7 oz frozen chopped spinach, thawed- DO NOT DRAIN*
3 large handfuls of  fresh spinach, chopped*
1 14 oz can artichoke hearts, drained and chopped
1 cup parm-ramano cheese mix (I used the grated variety)
½ cup mozzarella
12 oz prepared alfredo sauce**
1 TBS minced garlic
5-6 oz soft cream cheese
½-1 tsp onion powder
black pepper

Mix all ingredients into a crock pot insert.

Cover with saran wrap and let sit overnight in the fridge. 

Remove insert from fridge. Take the saran wrap off and place the lid on the dish. Place the insert into the crockpot. Heat on low for 2 hours, stirring once after about an hour.   

Thicken with a small amount additional Parmesan if needed.

Serve with tortilla strips.

* You may use 10oz frozen, thawed spinach in place of the combined fresh and frozen spinach. 

 **A quick note about this recipe: it is not gluten free by nature. If you are gluten free, be sure to check your ingredients carefully. If you can't find a prepared gluten free alfredo sauce, look for a gluten free alfredo sauce mix. Prepare it according to the package directions and proceed with the recipe.


Sunday, December 25, 2011

Merry Christmas

"The Savior—yes, the Messiah, the Lord—has been born today in Bethlehem, the city of David! And you will recognize him by this sign: You will find a baby wrapped snugly in strips of cloth, lying in a manger. Suddenly, the angel was joined by a vast host of others—the armies of heaven—praising God and saying,“Glory to God in highest heaven and peace on earth to those with whom God is pleased.”
Luke 2:11-14 NLT

Saturday, December 24, 2011

Gluten Free Lefse

It's time! It's finally time!

It's time for a Zimmerli family tradition (hmm perhaps it's a Synstelien tradition... Dad a little help on the origins please.) Either way.... it's time for lefse!

Last year I posted my southern twist on lefse. This year, I am gluten free. Because I love the tradition of lefse, I came up with a gluten free version that is just tender and flavorful as my dad's original recipe.

And once again- I caution you if you haven't ever made traditional lefse, learn from someone who knows how to prepare it. It takes years of practice and patience. But once you master it, your family will beg for it year after year.

Reheating gluten free lefse is a little more of a challenge because it naturally lacks gluten that holds it together. Adding xanthan gum helps to alleviate breaking and tearing.

For easy rewarming, I recommend putting one piece at a time in the microwave for 10-15 seconds. I fold my lefse before putting it in the fridge. If you do this as well, put the folded piece in the microwave, don't try to unfold it before you warm it or it will tear.

Before I send you off to make some delicious lefse- Charlie wanted to say hello from under "his" Christmas tree:

All the gifts have to stay on one side of the tree so he can go back into the corner to sleep and escape out the other side.

Rar! I am the keeper of the Christmas lights! (Fun fact: Charlie  has learned how to turn the lights on with the foot pedal switch so now we have to unplug the tree to prevent him from turning it on in the middle of the night.)

Here's to you and your culinary adventures, friends. Cheers!

Gluten Free Lefse*
Makes about 2 1/2 dozen pieces

*This recipe is intended for those who already know how to cook basic lefse.

3 lbs potatoes (3-4 large)
1/4 cup skim milk
4 TBS butter
3 heavy pinches kosher salt
fresh cracked black pepper
1 tsp xanthan gum
approximately 1 cup gluten free flour of your choice
1/4 cup tapioca flour
Additional tapioca flour for rolling out


Peel and cube potatoes. Put in a large pot and fill with cold water. Lightly salt. Bring to a boil. Reduce heat and simmer for 25-30 minutes until fork tender. Immediately drain.

Run potatoes through a ricer or food mill.

Warm milk and butter until butter is fully melted. Pour into riced sweet potatoes. Stir in and season with salt and pepper. Refrigerate, uncovered at least 4 hours until fully chilled.

Once chilled, add flours 1/2 cup at a time. Mix in until you've incorporated all the flour. You should have a soft dough that will still be slightly sticky.

Using tapioca flour- flour a large round pastry board. Pull a piece of dough the size of a golf ball. Dip in flour. Using a grooved rolling pin with a floured rolling pin sock, roll the dough out very thin. On my board I know it's thin enough when I can just barely make out the words on my pastry board.

Using a lefse stick, transfer lefse to your dry griddle. Cook 1-2 minutes per side until the bubbles are slightly golden. Do not overcook.

Move to a lefse cozy or between a few clean tea towels.

Monday, December 5, 2011

Easiest Turkey EVER

Ok, I know. I know. I said I'd be back more often and where have I been? Not here. I know.

But it's my crazy season kids! I work retail. It's the nature of the beast.

Take a peek at this little project- Our Advent calender for this year. Jon picked out the cute chubby penguin to mark the 25th. Even with a million and one things going on- there will always be time for arts and crafts!


This year for Thanksgiving at my parents house, we went semi non-traditional. I shared my recipe for corn bread stuffing with you in this post. I have a few more holiday recipes in upcoming blogs, so be on the lookout for those. 

Jon still had a hankering for a big turkey dinner. So, while the birds were still on sale for a great price, he picked one up. We have both been very busy with work and personal projects lately. As a result, big, family meals have been less than a priority than usual. We decided since we were both off- today was the day. Turkey day.

The best part of doing the whole meal today is I get to freeze some for future meals. And Jon gets turkey dinner leftovers for lunches- his favorite part of holiday meals. 

I found a recipe a few weeks ago I have been itching to try. It's a Trisha Yearwood recipe. It's a no-peek, hands-off recipe. I had to try it.

Here's how the day went:

I got the bird prepped and in the roaster. Cooked the turkey for 1 hour at 500. Turned it off and walked away. **Serious. Walk away (after you warn everyone in the house if they open the door the consequences will be dire...)**

We went to the beach and saw this amazingness-

Jon and I happened upon this beautiful picnic area with walking trails tucked into the trees along with beach.

I've never smelled the air so crisp, and clean as it was today.

Jon taking it all in

A sunset stroll on the beach. A perfect end to the day.

Ok! I had a day of fabulous relaxation. Walked over to the oven and took out  the "forgotten bird." Lifted the lid (braced myself in case I  just made a HUGE mistake...) And was completely wowed at the most beautiful bird I've ever cooked. I made Jon come into the kitchen and marvel at the moistness of the meat.

Made the rest of the fixin's and enjoyed a big meal with my hubby.

I love this recipe- I don't have to worry about basting or timing. It's perfect!

Here's to you and your culinary adventures, friends. Cheers!

Easy No-Peek Turkey

1 (12-pound) turkey, completely thawed, all giblets removed
1 stick salted butter, softened
2 TBS garlic salt
2 tsp pepper
2 stalks celery, cut in lengths to fit turkey cavity
1 medium onion, cut in quarters
1 large carrot, chunked
2 cups boiling water or chicken stock

Adjust oven racks so covered roasting pan fits easily inside oven. Preheat oven to 500 degrees F.

Rub butter on outside and in cavity of turkey. Sprinkle salt and pepper on outside of turkey. Put celery, onion, and carrot in cavity. Place turkey, breast side up, in a large roasting pan. Pour boiling water or chicken stock into pan. Cover with a tight-fitting lid and put pan in preheated oven.

Start a timer when oven temperature returns to 500 degrees F. Bake exactly 1 hour and turn off oven. Do not open oven door. Leave turkey in oven until oven cools completely; this may take 4 to 6 hours. (Mine  took about 5 hours) Carve as usual.

Saturday, November 26, 2011

GF Corn Bread Stuffing

Happy Belated Thanksgiving. My apologies on the tardiness of my greetings, but I was busy in retail land. AND spending time with the amazing family God has blessed me with. :)

I made something new this year for our family get together. This was my first major holiday as a gluten free girl in the kitchen.

We opted to go with corn bread instead of biscuits. So I scoured the web and found some very promising recipes.

I will admit to being a bit intimidated at the thought of feeding my family a recipe I hadn't ever made before. But, I went for it anyway. And I can tell you with certainty, I will be making this again my friends.

There were a few slices left over so I decided to try a scaled down batch of corn bread stuffing (ok, I know it was technically dressing since I didn't do it in a bird. Deal with it. LOL)

Mmmm Corn Bread Dressing


It was the most flavorful stuffing/dressing I have ever made! Completely from scratch. It was a tasty success. I have no problem making this dish for my next big holiday meal.


Here's to you and your culinary adventures, friends. Cheers!


Gluten-Free Cornbread & Cornbread Stuffing

For the cornbread:
 1/2 cup all purpose gluten free flour (I used Hodgson Mill Gluten Free All Purpose Baking Mix)
 ½ cup scant brown rice flour
2 TBS corn starch or tapioca starch
2 TBS packed brown sugar
2 1/2 tsp baking powder
1 tsp xanthan gum 
1 tsp salt
4 TBS butter, softened
1 1/2 TBS olive oil
3/4 cup cornmeal
1 cup buttermilk
2 large eggs or 1/2 cup egg beaters

Preheat the oven to 400F. 

Place a 9x9 baking pan in the oven.

Dry ingredients: Whisk together flour blend, rice flour, corn starch, brown sugar, baking powder, xanthan gum, and salt. Use your fingers to cut 2 TBS of butter into the flour mixture until it resembles the consistency of peas. Whisk in cornmeal. Set aside.

Wet Ingredients:  Whisk the buttermilk, eggs, oil, and 1 TBS melted butter together.

Dump the wet ingredients into the dry and mix until just combined. 

Carefully remove the baking dish from the oven. Place remaining 1 TBS butter in the bottom. Swirl to coat the bottom and sides.

Pour the cornbread batter into the hot dish and bake for 15 – 20 minutes, until the top is golden brown and it tests clean with a toothpick.

Let cool slightly before slicing. Serve warm with room temperature butter. Wrap and freeze leftovers. Or let sit out overnight and make corn bread stuffing the next day.


Corn Bread Stuffing

1 recipe day old gluten-free cornbread, cut into small cubes and dried out (about 5 cups)
3 TBS butter
1/2 medium onion, finely diced
2 ribs of celery sliced thin
2 cloves garlic, minced
1 tsp poultry seasoning (more if you like)
1/4 tsp each- garlic and onion powder
1 cup homemade chicken stock
1/3 cup chopped pecans, slightly toasted
1 small chicken breast, diced small or shredded
freshly ground black pepper & salt to taste

Preheat oven to 325 degrees F.

Melt butter over medium low heat. Add onion and celery. Cook for 5 minutes, add spices and  minced garlic. Cook for another 5 minutes or until celery is tender. Remove from heat and place into a large bowl.  

Add chicken and pecans to veggie mix.

Dump cornbread into the bowl. Add chicken stock. Gently mix so you don't tear up the bread. This is where you have to use your own judgment – you want the dressing to be wet but not soggy. You want just enough liquid so the bread can absorb it all but not so much that it's swimming in a puddle of broth.

Gently turn dressing into desired dish. Spread gently. A larger pan allows you to spread it for a thinner dressing. A smaller pan will produce a thicker dressing. The choice is yours.

Cover and bake for 30 minutes. Uncover and bake another 30 minutes, until top is golden brown and crispy.


Wednesday, November 9, 2011

Baked Apple Chips

I am always trying to get that sweet husband of mine to eat more fruits and veggies. It has been an ongoing battle challenge for years now. He willing eats what I put on his plate, but he hasn't gotten to the point where he goes out of his way to get them on his own.

To his credit, he willingly eats raw carrots, raw or cooked green beans, and baked beans. He even asks for them now :)

But fruit is still another story. He'll eat dehydrated fruit, but I don't always have time to make it/babysit the dehydrator.(No one likes overly dried fruit, and yes there is such a thing.) Store bought dehydrated fruit- particularly banana chips,  is often fried in a palm or coconut oil before it's actually dehydrated. Icky and not healthy!

A few years ago I introduced Jon to the world of baked apple chips. I have a few recipes, but the one I am going to share today is one of his favorites. It's one of the few fruit things he asks for every fall.

These are really simple, don't be scared by the lengthy instructions. There are only about 15-20 minutes of hands on prep work, the rest is either soaking or baking.

Oh hey! Before we bake some apple chips- let's see what Flat Stanley has been up to this week shall we?

Button Angels!
I caught him in my button collection making button angels the other day. His explanation? With no snow in southern Georgia he can't make snow angels, so he improvised.

Here's to you and your culinary adventures, friends. Cheers!

Baked Apple Chips

3 medium apples
1 cup water
1/2-2/3 cup packed brown sugar
1/2 tsp cinnamon

In a medium sized pot with a lid- combine the sugar, water, and cinnamon. Bring to simmer. Stir to make sure all the sugar is dissolved.Set aside.

Core apples. (I have an apple coring tool, but you can use a paring knife to cut out just the core. You want the apples to remain whole.)

On a mandolin or with a sharp knife- slice the apples into 1/16 inch thick rings.

Put the apples into the warm syrup. Gently press the apples down so they are all coated well. Place the lid on the pot. Let the apples soak for 10 minutes.

Line two large sheet pans with foil. Spray lightly with cooking spray.

Remove the apples from the syrup one at a time, shaking off the excess. Line them up on the baking sheets. Don't overlap the slices.

Place oven racks in the middle of the oven. Preheat to 250.

Set one pan of apples on each rack. Bake for 30 minutes. Rotate pans so the top pan becomes the bottom pan and the bottom pan becomes the top. Bake 30 minutes. Flip all the apples over. Return to oven for 15-20 minutes longer.

The apples should be lightly browned. Once they cool, they will be nice and crisp.

Allow to cool completely before storing in a paper bag.

***Save the apple infused syrup for another batch of apples in the fridge OR use it to sweeten hot or cold tea.***

Wednesday, October 19, 2011

Scalloped Potatoes with Ham

Early in my high school days, my mom made scalloped potatoes.

From scratch.

I had no idea such a thing existed up until that point. All I knew were boxed scalloped potatoes, which tasted exactly the same as the boxed au gratin potatoes to me. And, honestly, I wasn't a huge fan.

So, when she came to the table with something similar to this:

Thick cut potatoes and diced ham soaking up  luscious creamy sauce
I was a bit surprised. There weren't any paper thin, slightly under-cooked potatoes (the re-hydrating process never really brings those dehydrated potatoes back to their former glory) swimming in an unnaturally colored orange sauce.

Instead, there were thick slices of tender russet potatoes from our garden. Little bits of onion, garlic, and mushroom. Large chunks of diced, meaty ham. And a topping it all off, just the right amount of freshly shredded cheddar cheese.

It was so flavorful. And the leftovers were even better. It was a recipe I had to add to my favorites cookbook when I moved away from home.

It remains of my favorite winter comfort foods to this day. Thank you, Mom!

Here's to you and your culinary adventures, friends. Cheers!

Mom's Scalloped Potatoes with Ham
Serves 6

8-10 oz smoked ham, diced large
4 large russet potatoes, peeled and sliced thick
1/2 cup diced onion
2 cloves garlic, diced fine
1/2 cup light sour cream
1 can cream of mushroom soup*
1/2 tsp garlic salt
1/2 tsp garlic powder
a pinch of cayenne pepper
1/4-1/2 tsp dried Italian herbs
1/4 tsp pepper
1/2 cup shredded cheddar cheese

Boil potatoes, onion, and garlic for 12-15 minutes. Drain.

Preheat oven to 350 degrees.

In a medium sized bowl combine soup, sour cream, garlic salt, garlic powder, Italian herbs, cayenne, and pepper. Stir in half the cheese.

In a prepared casserole dish, layer potatoes, ham, and sour cream/soup mix. **Top with remaining cheese.

Microwave 5 minutes. Cover and bake 20 minutes until bubbly. Let stand 5-10 minutes to thicken before serving.

*If you are gf, be sure your cream of mushroom soup is gluten free. 

** My mom layers 1/2 the potatoes, 1/2 the ham, 1/2 the sauce, then repeat. I choose to do a single layer for quicker prep. In the dish in the photo I simply folded everything together and poured it in. Whichever way you choose is fine, just do what works for you. :)

Monday, July 4, 2011

Buckeye Bars

HAPPY 4th OF JULY!

I have had a ton of hits on my post about my dad's peanut butter buckeyes. So, when I found a similar recipe in bar form, I had to try it.

I made a pan up and brought them to a church potluck. They flew off the plate.

When I went to retrieve my dish, someone in the kitchen asked what the plate looked like. I started to say it was a square dish, but I was immediately cut off by the entire kitchen staff who said "The one with the peanut butter chocolate bars?!"

I got excellent reviews for these little bars of happiness. And now, I pass the love along to you. :)

Here's to you and your culinary adventures, friends. Cheers!


Peanut Butter Bars
Makes one 9x13 pan

1 1/2 cups crushed graham cracker crumbs (just over one pack)
3 1/2 cups powdered sugar
1 1/2 cups creamy or chunky peanut butter
1 cup (2 sticks) butter, melted
12oz milk chocolate chips


In a large mixing bowl, combine graham cracker crumbs, powdered sugar and peanut butter and butter and beat until combined.  Press into a foiled lined 9×13 pan. Refrigerate for 20 minutes until firm.

Place chocolate chips in a microwave safe bowl and heat in 30 second intervals, stirring after each one, until melted and smooth.  Pour chocolate over peanut butter mixture and spread out evenly.

Chill in the fridge just until chocolate is just set and then cut into bars.  Use a sharp knife and score the cuts first, then gently cut through.  Can be stored in the fridge or at room temp.  They will stay firmer if stored in the fridge.

Wednesday, June 29, 2011

Super Potato Salad

I had the best potato salad I have ever had in my entire life last night. And you know what, the leftovers were even better. This recipe is crazy good!

Photo from kraftrecipes.com

So, all I really have to say is... make this. Today. (Then wait and eat it tomorrow if you can stand to wait that long)

Here's to you and your culinary adventures, friends. Cheers!

Bacon, Ranch, Potato Salad*
Makes 7 servings (1/2 cup each)
160 calories per


1 1/2 lb. small red potatoes, quartered
1/4 cup miracle whip or olive oil mayo
1/8 cup  ranch dressing
3 TBS (heaping) Oscar Meyer Real bacon bits, crisped in the microwave and cooled to room temperature OR 3 strips bacon, cooked, crumbled and cooled.
1/2 cup (2 oz)  shredded cheddar cheese
2 green onions, thinly sliced or onion powder to taste
salt and pepper to taste 

Place potatoes in a medium sized pot. Add water just to cover the potatoes; cover with lid. Simmer 13-15 minutes,  until potatoes are just fork tender; drain. Place in large bowl. Cover loosely with a clean towel.

Refrigerate potatoes for 1 hour or until completely cooled.  

Mix mayo and dressing. Add to potatoes with remaining ingredients; mix lightly.Chill well for at least an hour. Overnight is best.


Helpful hint from Kraft:
When cooking potatoes for a potato salad, remember that the potatoes will continue to cook even after you have drained them. As soon as the cooked potatoes are fork tender, drain them, then run them under cold water to quickly cool them. When in doubt, it is better to undercook the potatoes rather than overcooking them.

* This recipe came to me in an email from kraftrecipes.com and is called  "steakhouse potato salad."

Sunday, June 26, 2011

Momma's VBS Carmel Corn

My mom and dad just wrapped up another year of Vacation Bible School at their church. Dad did music and choreography with the kiddos while Mom and her crew fed the small army each day. One of the snack items they made was carmel corn. (Well, technically it was supposed to be like Cracker Jack, but some of the children had peanut allergies so they were omitted)

Mom gifted us with a sample of her carmel-y corn and I just had to have the recipe.

Today, I will share with you how to take 3 bags of microwave popcorn and turn them into a sweet, crunchy treat.

3 bags of popped microwave popcorn

1 thunderstorm + 1 good book + 1 bowl of carmel corn = a great night in

A word of caution: this recipe is 100% dangerous to anyone on a diet. Don't say I didn't warn you... ;)

VBS Carmel Corn
24 (1-1/4 cup) servings

30 cups popped popcorn (3 3oz microwave bags)
2 cups brown sugar
½ cup dark corn syrup
1 cup (2 sticks) margarine
½ tsp baking soda
1 tsp vanilla extract
Cooking spray

Preheat oven to 250 degrees.

Use cooking spray on anything the wet caramel will touch. (Makes for easier cleanup later.)
Pop each bag of popcorn. Place the popped corn into a roaster pan, removing unpopped kernals*.

In a large, deep saucepan combine brown sugar, corn syrup, and margarine. Bring to a boil over medium
heat, stirring to blend. When the mixture begins to boil, boil 5 minutes, stirring constantly. 

Remove from heat and stir in the baking soda and vanilla. The mixture will be light and foamy.
Immediately pour caramel over the popcorn and gently stir to coat.  Don’t worry too much about getting all the popcorn coated.

If baking in the roaster: Bake uncovered for 1 hour, carefully stirring every 15 minutes.

If baking on the two baking sheets: Divide the popcorn between the two baking sheets. Bake
for 45 minutes, carefully stirring every 15 minutes.

Line a table or counter with waxed paper. Dump the popcorn onto the wax paper and separate pieces as needed. Allow to cool completely, then store in airtight bags. (I just returned mine to the roaster, covered with a layer of foil and put the lid back on. The foil was to ensure it was airtight due to living in a humid climate)

* If you don't remove the kernels you run the risk of breaking a tooth. Take the time and remove them please.

Monday, June 6, 2011

Triple Chocolate Crispy Bars

I love chocolate. LOVE.

I also enjoy rice crispy bars.

So when I saw the new chocolate royale marshmallows by Kraft, it was a done deal. It must have been written all over my face because Jon said "you just got an idea didn't you." Oh yes friends, I got an idea all right.

Triple chocolate rice crispy bars. They turned out so good. Jon insisted that I share the recipe.

Here's to you and your culinary adventures, friends. Cheers!

Triple Chocolate Rice Crispy Bars

3 TBS margarine or butter
1 bag chocolate royale marshmallows
8 cups chocolate rice crispy cereal (we used Cocoa Pebbles)
6 oz (about half a package) white or milk chocolate chips

Melt butter in a large bowl in the microwave. Add marshmallows. Stir to coat.

Melt the marshmallows using the DEFROST option. (seriously, it makes a huge difference) Once the marshmallows are all puffed up and soft, give them a quick stir. Add cereal and stir to mix well.

Spray a 9x13 pan with cooking spray. Transfer the cereal mixture to the pan. Spray your fingers with cooking spray. Press the cereal into an even layer. Allow to cool slightly.

Meanwhile, pour chips into a glass bowl. Microwave in 30 second intervals, stir well each time to melt evenly. Pour melted chocolate over the cereal bars. Using a spatula, spread  the chocolate evenly.

Refrigerate until firm. Remove from fridge and cut into bars. To store keep covered at room temperature.

Monday, May 23, 2011

Gram's Carrot Cake

I have been thinking about my Grandma S's carrot cake for a solid week now. It's the best carrot cake I've ever had.

Both of my grandma's are great cooks and bakers. I am always very happy to have family recipes to add to my own collection. :)

Through the magic of facebook, one of my aunts was kind enough to send me the recipe.Thank you Carla!

So, let me share with you how we turn these carrots: 

into this batter:


And finally- into this amazing cake:

Here's to you and your culinary adventures, friends. Cheers!

Gram's Carrot Cake
Makes 12-16 servings

1 cup white sugar
2 eggs or 1/2 cup egg beaters
1/2 cup + 2 TBS oil
1 cup flour
1/4 tsp salt
1 tsp soda
1 1/2 tsp cinnamon
1 1/2 cups ground carrots

Mix sugar and eggs together. 

Add oil. Stir until well incorporated.

Stir in flour, salt, soda, and cinnamon. Mix until mostly combined.
Add carrots. Stir until just combined. 

Pour into a prepared 9x9 cake pan. Bake at 325 for 30-40 minutes (until a toothpick inserted into the center comes out clean. )

Allow to cool completely. 

Frost with cream cheese frosting.


Cream Cheese Frosting:

1- 1 1/2 cups powdered sugar
4oz cream cheese
1/2 stick butter
3/4 tsp vanilla

Cream the cream cheese then stir in sugar and butter, add vanilla, mix well.