
Welcome to Today! Yea, I don't know what day it is any more... What I do know is that I am still hanging in the kitchen and making my way through my Cooking Light Project.
I've been experimenting with various protein shakes using Orgain Organic Plant Based Protein powder. Yea, it's a long way of saying not whey. I still struggle with lactose that isn't aged or filled with probiotics and whey is literally dehydrated lactose. Not my friend.
So after way too many hours of research, I found one that is lactose free. The base of the mix is pea powder, brown rice flour, and chia seed powder. They have a bunch of flavors as well as blends with super foods, greens, and keto mix.
I went with vanilla bean. It smells fantastic. My two favorite recipes I've made are cherry dip cone and orange dreamscicle. When I get my hands on some chocolate pudding, I'm going to do a chocolate dipped strawberry shake.
So here's a bonus "recipe":
1-2 scoops Organic Plant Based Protein- vanilla
1 heaping TBS vanilla pudding powder
1 1/2 TBS jello mix (Cherry flavor for cherry dip, orange for dreamscicle)
1 cup ice
1/2 cup cold water
Throw it all in a blender. Whirl until smooth and thick.
These help me stay full, longer. And they increase my water intake while being delicious. I actually enjoy making up these decadent tasting shakes that are only between 175-240 calories. They curb my sweet tooth and make a great snack.
Now, as promised in the orange rolls recipe- A new chicken recipe!
This recipe is part of the Cooking Light Project. I have put off this recipe because it uses wine. Not that I don't like wine, I do. I just don't have any on hand and I don't want to go to the liquor store just to get a bottle of white wine for 1/2 cup worth.
Then, I took to the interwebs! (Yea, that's what we call it in my family lol) I found out that you can successfully substitute a 1 to 1 ratio of water and apple cider vinegar. I was nervous about the flavor, but it decided to give it a try.
To my very happy surprise, it works!!!! You have a beautiful tang, not vinegary at all, subtly sweet. I would recommend this as an acceptable sub for white wine in a recipe.
Ok. Enough chit chat! I'm going to share the recipe and head back to the kitchen for my next great meal.
Cheers!
Chicken Scaloppine with Broccoli
Serves 4
1 TBS olive oil
1/3 cup Panko Crumbs
1/2 tsp Italian seasoning
1/4 tsp black pepper
4 (4oz) boneless, skinless chicken thighs- pounded thin
1/4 cup apple cider vinegar + 1/4 cup water OR 1/2 cup white wine
1/2 cup chicken broth
3 TBS lemon juice
1 tsp butter
1 lb broccoli, cut into bite sized pieces (I used frozen florets)
2 TBS parsley
2 TBS capers, drained and rinsed
Heat oil in a large nonstick skillet over medium heat.
Combine breadcrumbs, pepper, and Italian seasoning in a small dish. Dredge the chicken in the breadcrumbs. Add chicken to pan and cook 3-4 minutes each side or until cooked through. Remove from the pan. Keep warm.
Add water/vinegar or wine, broth, lemon juice, and butter to pan. Scrape any brown bits off the bottom of the pan. Add in the broccoli. Cover and cook until tender. Stir in parsley and capers.
To serve, plate broccoli. Top with chicken and pour sauce over the chicken and broccoli mix.
Wednesday, April 15, 2020


Friday, April 10, 2020
Yeast Free Orange Crescent Rolls
I'm going to be short and sweet on this post.
As the world seems to have gone bonkers for yeast in the last month or so... I am perfecting my non-yeast breads.
The crescent dough for this recipe would be perfect if you wanted to use it for a pizza dough base. Add some garlic powder, Italian seasonings, and brush with a little olive oil. You are good to go!
If you need a sweet breakfast or new snack to have with your coffee, these are definitely worth a try. You can of course change out the orange filling for cinnamon sugar and make cinnamon rolls.
I have a new chicken recipe coming for you shortly! Stay healthy. Stay sweet.
Cheers!
Yeast Free Orange Crescent Rolls
Makes 12 Fluffy Crescents!
Crescent Roll Dough:
2 cups flour
3 TBS sugar
1 TBS baking powder
1 tsp salt
5 TBS cold butter, cubed small
3/4 cup almond milk
Filling:
6 TBS white sugar
2 TBS grated orange rind
1 TBS melted butter
Glaze:
6 TBS white sugar
2 TBS Butter
1 TBS fresh orange juice
1/4 cup sour cream
To make the crescent rolls:
Combine flour, sugar, baking powder, and salt. Mix.
Using a pastry cutter, cut in the cold butter into the flour. Once the mixture is like cornmeal, add the almond milk. Stir together until just combined.
Dump dough onto a floured surface. Sprinkle with flour. Begin kneading the dough, add additional flour as needed to prevent sticking.
Knead until the ball is smooth and slightly elastic. Leave the dough on the floured surface. Cover with a clean bowl. Let sit for at least 30 minutes. This will allow the dough to relax and makes it easier to roll out.
The dough will be soft but not sticky. After sitting, it will NOT have risen as there is no yeast. The rising happens in the oven.
While the dough is resting, mix the orange zest and sugar for filling.
Remove the bowl from the dough and roll out into a 12-14 inch circle on a floured surface. Brush the circle with 1 TBS melted butter. Sprinkle orange sugar over all.
Using a sharp knife or pizza cutter, cut 12 triangles from the dough circle. Roll up each wedge tightly beginning at the wide end.
Place the rolls, seam side down in a prepared 9x9 baking dish. (You can use a larger dish if you don't want them to touch)
Preheat oven to 350. Bake, uncovered for approximately 25 minutes until lightly golden.
While the crescents bake, make the glaze. Combine sugar, butter, and orange juice in a small saucepan. Bring to a boil over medium heat. Cook 3 minutes or until sugar is dissolved. Stir regularly to prevent scorching. Remove from heat. Allow to cool slightly. Stir in sour cream.
Once rolls are baked, pour glaze over warm rolls. Let stand at least 20 minutes before serving.
Tuesday, March 31, 2020
Easy Naan and Jerusalem Artichoke Hummus
Greetings and Salutations! What a wild year March has been! I took a break from the normal days of hand washing and staring out the window at squirrels to celebrate my birthday.
As we are deep into shelter in place, curfews, and general lockdown status, I was afraid my birthday would be a bust. My fantastic parents who live within an hours drive of me offered to have me spend the night and celebrate as a family. I went from my house to their house and we stayed put. We played Rummikub, cooked, investigated a woodpecker nest in the yard, and simply enjoyed spending time together. As simple as it was, it was incredibly special. I am blessed to have the family I do.
So! Now, another year wiser I am continuing my kitchen adventures. My mom gets a misfits market produce box regularly and this time she got the MADNESS box. That's 22 lbs of fresh fruits and veg y'all. She split it with me and so I have ingredients I've never even looked at twice. (I was NOT sad she offered to share her bounty with me! Thanks, Mom!)
First test? Jerusalem Artichokes. I had no idea what they were or how they tasted. I had heard of them along my kitchen adventures, but that was the extent of it. Fun fact- Jerusalem Artichokes and Sunchokes are one in the same! Whatever you call them, they are yummy.
After I did some research, I found they are a quite versatile little root vegetable. I decided to make a hummus with them. After roasting, the skins peel off very easily and they smell just like artichokes. Word to the wise- they do cause some, uh, flatulence, so maybe don't serve this at a fancy pants dinner... But the flavor is well worth it! The longer it sits, the more artichoke flavor comes out.
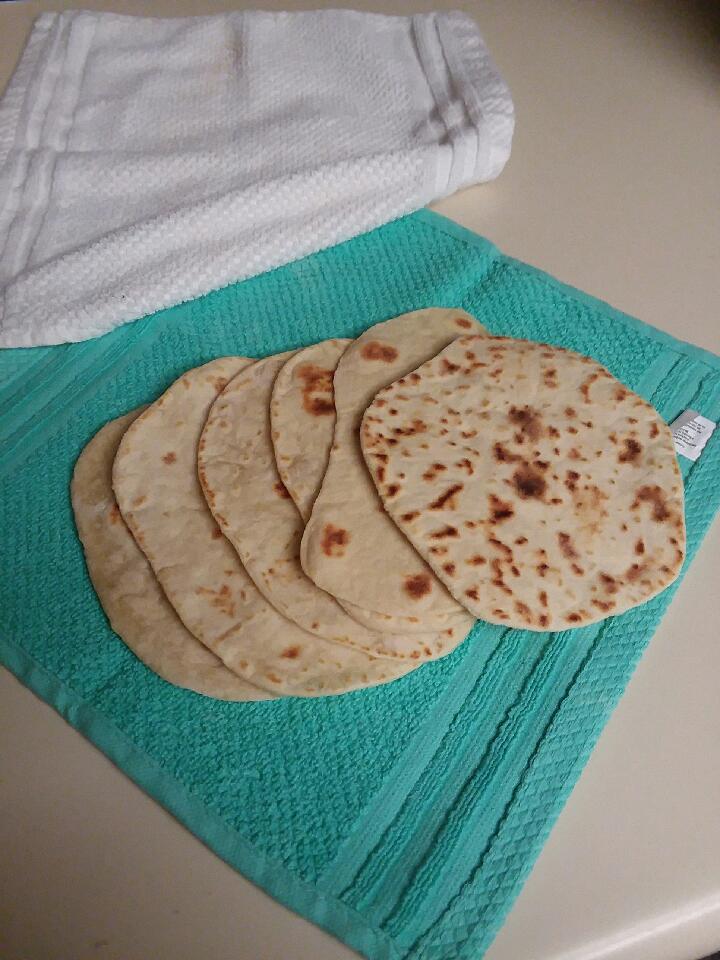
After I made the hummus I realized I need a vehicle to eat said hummus. I found a super easy recipe for yeast free Naan and made some alterations to fit my needs. I will never buy store bought Naan ever again! This is so easy and the flavor is so much better!
I hope you are all staying healthy! Go have your own kitchen adventure. Its a perfect time to experiment.
Cheers!
Jerusalem Artichoke Hummus
3-4 medium Jerusalem Artichokes
1 (15oz) can of garbanzo beans, rinsed
1/4 cup good quality olive oil
1/4 cup lemon juice
2 cloves garlic
1 TBS parsley
salt, pepper, paprika, and lemon pepper to taste.
Preheat oven to 375 F.
Wash artichokes well. Wrap in a parchment paper pouch, and place in a baking dish, seam sides down. (you can use foil for this if you choose) Roast in the oven for 45 minutes until very soft. Let cool.
Once the artichokes are cool enough to handle, remove the skins.
Place the flesh in a blender with all remaining ingredients. Blend until smooth. You may need to add some water if too thick. Add 1-2 TBS at a time, pulse the mix to slowly incorporate.
Serve with fresh naan or pita chips.
Easy Naan Bread
Makes 6 small flat breads
1 ¼ cup all purpose flour
½ teaspoon baking powder
1/2 scant teaspoon granulated sugar
½ teaspoon salt
3 tablespoons + 1 teaspoon milk
2 tablespoons butter
¼ cup plain sour cream
Mix flour, baking powder, sugar and salt in a medium large bowl.
In a microwave safe container, melt butter. Add milk and return to microwave. Heat until warmed through, do not allow to boil or get overly hot.
Add sour cream and stir into warm milk until smooth.
Make a well in the dry ingredients. Pour in sour cream mixture. Stir gently until the ingredients come together.
Using your hands, knead the dough in the bowl to form a soft ball. Transfer dough to a lightly floured surface. Knead until dough is smooth and no longer sticky. You may need to add flour as you go. Dough will be soft! DON'T OVER WORK!
Let the dough rest for ½ hour on a lightly-floured surface and put the empty bowl upside-down on top of it. The longer the dough rests, the softer it gets and the easier it will roll out.
Split dough into 6 equal parts, shape each into a ball and roll out.
Rotate the dough-disk while rolling, and flip it over occasionally. Sprinkle with flour every now and then, so it will not stick to your rolling pin or surface. You want your disks to be about 1/8 inch thick.
Preheat skillet or griddle to medium high heat. Do not add any oil or fats.
Gently transfer your naan to the cook top you are using. Cook until bubbles have formed on top and the bottom side gets lightly nicely browned. Then flip, and cook until done, about 1 minute.
When each nann bread is cooked, rest it between two clean kitchen towels or in a lefse cozy, keeping them warm while baking the rest. As you add each completed naan, flip and rotate the resting breads to allow steam to keep working its way through the breads. This keeps the breads nice and soft!
Once cool, store in an airtight container at room temperature.
 |
| 35, when did THAT happen!? |
 |
| MMMMM my traditional Angel Food Cake! This year I had blueberry sauce drizzled over the top. |
As we are deep into shelter in place, curfews, and general lockdown status, I was afraid my birthday would be a bust. My fantastic parents who live within an hours drive of me offered to have me spend the night and celebrate as a family. I went from my house to their house and we stayed put. We played Rummikub, cooked, investigated a woodpecker nest in the yard, and simply enjoyed spending time together. As simple as it was, it was incredibly special. I am blessed to have the family I do.
So! Now, another year wiser I am continuing my kitchen adventures. My mom gets a misfits market produce box regularly and this time she got the MADNESS box. That's 22 lbs of fresh fruits and veg y'all. She split it with me and so I have ingredients I've never even looked at twice. (I was NOT sad she offered to share her bounty with me! Thanks, Mom!)
First test? Jerusalem Artichokes. I had no idea what they were or how they tasted. I had heard of them along my kitchen adventures, but that was the extent of it. Fun fact- Jerusalem Artichokes and Sunchokes are one in the same! Whatever you call them, they are yummy.
 |
| Jerusalem Artichoke AKA Sunchokes are a root vegetable |
After I did some research, I found they are a quite versatile little root vegetable. I decided to make a hummus with them. After roasting, the skins peel off very easily and they smell just like artichokes. Word to the wise- they do cause some, uh, flatulence, so maybe don't serve this at a fancy pants dinner... But the flavor is well worth it! The longer it sits, the more artichoke flavor comes out.
 |
| Mmmmm creamy, artichoke-y, lemony hummus |
 |
| Warm, soft Naan! |
I hope you are all staying healthy! Go have your own kitchen adventure. Its a perfect time to experiment.
Cheers!
Jerusalem Artichoke Hummus
3-4 medium Jerusalem Artichokes
1 (15oz) can of garbanzo beans, rinsed
1/4 cup good quality olive oil
1/4 cup lemon juice
2 cloves garlic
1 TBS parsley
salt, pepper, paprika, and lemon pepper to taste.
Preheat oven to 375 F.
Wash artichokes well. Wrap in a parchment paper pouch, and place in a baking dish, seam sides down. (you can use foil for this if you choose) Roast in the oven for 45 minutes until very soft. Let cool.
Once the artichokes are cool enough to handle, remove the skins.
Place the flesh in a blender with all remaining ingredients. Blend until smooth. You may need to add some water if too thick. Add 1-2 TBS at a time, pulse the mix to slowly incorporate.
Serve with fresh naan or pita chips.
Easy Naan Bread
Makes 6 small flat breads
1 ¼ cup all purpose flour
½ teaspoon baking powder
1/2 scant teaspoon granulated sugar
½ teaspoon salt
3 tablespoons + 1 teaspoon milk
2 tablespoons butter
¼ cup plain sour cream
Mix flour, baking powder, sugar and salt in a medium large bowl.
In a microwave safe container, melt butter. Add milk and return to microwave. Heat until warmed through, do not allow to boil or get overly hot.
Add sour cream and stir into warm milk until smooth.
Make a well in the dry ingredients. Pour in sour cream mixture. Stir gently until the ingredients come together.
Using your hands, knead the dough in the bowl to form a soft ball. Transfer dough to a lightly floured surface. Knead until dough is smooth and no longer sticky. You may need to add flour as you go. Dough will be soft! DON'T OVER WORK!
Let the dough rest for ½ hour on a lightly-floured surface and put the empty bowl upside-down on top of it. The longer the dough rests, the softer it gets and the easier it will roll out.
Split dough into 6 equal parts, shape each into a ball and roll out.
Rotate the dough-disk while rolling, and flip it over occasionally. Sprinkle with flour every now and then, so it will not stick to your rolling pin or surface. You want your disks to be about 1/8 inch thick.
Preheat skillet or griddle to medium high heat. Do not add any oil or fats.
Gently transfer your naan to the cook top you are using. Cook until bubbles have formed on top and the bottom side gets lightly nicely browned. Then flip, and cook until done, about 1 minute.
When each nann bread is cooked, rest it between two clean kitchen towels or in a lefse cozy, keeping them warm while baking the rest. As you add each completed naan, flip and rotate the resting breads to allow steam to keep working its way through the breads. This keeps the breads nice and soft!
Once cool, store in an airtight container at room temperature.
Thursday, March 26, 2020
She blinded me with Science (cake)
Welcome to another edition of Staying Sane by Cooking during a pandemic!
I decided to honor my roots by cooking a tried and true recipe called Depression Cake or as Mom and I call it- SCIENCE CAKE!!!!
Before I get into that, let me give you a brief insight into my life.
I am a science nerd. I love to find out how things work, why, what makes them tick?


These 3 shows right here were my jam! They appealed to my inquisitive nature and helped to develop a healthy hunger for learning.
My Grandpa Spranger always encouraged us to explore our world. He would often smuggle gifts into the trunk of the car when we were leaving for home after a visit. Sometimes he was caught and the "gift" was returned promptly. Other times he got away with it- a chemistry set, dissection kit, and a portable pond were just a few of the truly memorable ones. The fun part was we lived 6 hours away, you couldn't exactly just walk it back over. :)
I loved to scoop up tadpole eggs in the pond by our house and watch them grow, then we'd release the them once they got big enough to not be eaten by fishies.
Even in middle school, I fully enjoyed dissecting owl pellets and identifying what they had for supper. (Easiest A of my life!) Later, when my lab partner fainted over African Frog dissection, I gladly did the entire project. The smell of formaldehyde isn't for everyone...
Anyway, you get the picture, me and science are besties!
Food is no different. I like to know why and how things work the way they do. I came across this cake that has no eggs, no butter, and gets mixed in the pan it bakes in.
Ok, I don't see how this works... then I get to the leavening agent: baking soda and.....VINEGAR. What?! Oh, I'm in now. I've made the volcano that erupts with this combination. I gotta see how this works!
This cake is delicious as soon as it cools, but I found the crumb was better on day 2. It seemed to hold better as it sat. I did read that you can omit the cocoa powder and make a white cake, and now I wonder if I could replace the cocoa with jam and make a peanut butter and jelly cake!
I was pleasantly surprised at how beautifully this cake rose, and DIDN'T explode in my oven. You can't taste the vinegar, which was an admitted concern of mine. Just creamy, chocolate goodness.
Here's to some tasty science and an inexpensive treat!
Science Cake!
Aka Depression Cake
Makes an 8x8 pan
1 ½ cups all-purpose flour
1 cup white sugar
4 tablespoons unsweetened cocoa powder
1 teaspoon baking soda
½ teaspoon salt
1 teaspoon vanilla extract
1 tablespoon cider vinegar
6 tablespoons vegetable oil
1 cup water
Preheat oven to 350 degrees
Sift flour, sugar, salt, soda, and cocoa together into an 8x8 inch ungreased cake pan. Make three depressions. Pour oil into one well, vinegar into second, and vanilla into third well. Pour water over all, and stir well with fork
Bake at 350 degrees F for 35 to 40 minutes, or until tooth pick inserted comes out clean.Once cooled, frost with your favorite frosting.
I decided to honor my roots by cooking a tried and true recipe called Depression Cake or as Mom and I call it- SCIENCE CAKE!!!!
Before I get into that, let me give you a brief insight into my life.
I am a science nerd. I love to find out how things work, why, what makes them tick?


These 3 shows right here were my jam! They appealed to my inquisitive nature and helped to develop a healthy hunger for learning.
My Grandpa Spranger always encouraged us to explore our world. He would often smuggle gifts into the trunk of the car when we were leaving for home after a visit. Sometimes he was caught and the "gift" was returned promptly. Other times he got away with it- a chemistry set, dissection kit, and a portable pond were just a few of the truly memorable ones. The fun part was we lived 6 hours away, you couldn't exactly just walk it back over. :)
I loved to scoop up tadpole eggs in the pond by our house and watch them grow, then we'd release the them once they got big enough to not be eaten by fishies.
Even in middle school, I fully enjoyed dissecting owl pellets and identifying what they had for supper. (Easiest A of my life!) Later, when my lab partner fainted over African Frog dissection, I gladly did the entire project. The smell of formaldehyde isn't for everyone...
Anyway, you get the picture, me and science are besties!
Food is no different. I like to know why and how things work the way they do. I came across this cake that has no eggs, no butter, and gets mixed in the pan it bakes in.
Ok, I don't see how this works... then I get to the leavening agent: baking soda and.....VINEGAR. What?! Oh, I'm in now. I've made the volcano that erupts with this combination. I gotta see how this works!
This cake is delicious as soon as it cools, but I found the crumb was better on day 2. It seemed to hold better as it sat. I did read that you can omit the cocoa powder and make a white cake, and now I wonder if I could replace the cocoa with jam and make a peanut butter and jelly cake!
I was pleasantly surprised at how beautifully this cake rose, and DIDN'T explode in my oven. You can't taste the vinegar, which was an admitted concern of mine. Just creamy, chocolate goodness.
Here's to some tasty science and an inexpensive treat!
Science Cake!
Aka Depression Cake
Makes an 8x8 pan
1 ½ cups all-purpose flour
1 cup white sugar
4 tablespoons unsweetened cocoa powder
1 teaspoon baking soda
½ teaspoon salt
1 teaspoon vanilla extract
1 tablespoon cider vinegar
6 tablespoons vegetable oil
1 cup water
Preheat oven to 350 degrees
Sift flour, sugar, salt, soda, and cocoa together into an 8x8 inch ungreased cake pan. Make three depressions. Pour oil into one well, vinegar into second, and vanilla into third well. Pour water over all, and stir well with fork
Bake at 350 degrees F for 35 to 40 minutes, or until tooth pick inserted comes out clean.Once cooled, frost with your favorite frosting.
Peanut Butter Frosting (It's one of my favs with chocolate cake!)
Makes enough for an 8x8 cake including the sides
1/2 cup butter, softened
1/2 cup creamy peanut butter
1 1/2 cups powder sugar
1/2 tsp vanilla
1/4 tsp salt
1-2 TBS almond milk or milk
Using a mixer, cream together the butter and peanut butter.
Slowly add the powdered sugar. It will be thick!
Once the butters and sugar are well mixed, add vanilla, salt, and 1 TBS milk and mix with the mixer until light and fluffy. If needed, add another TBS of milk to get the desired consistency.
Wednesday, March 25, 2020
Wontons 3 ways!!!
Hello from Covid19 Quarantine! What a wild time we are living in. Large cities in complete lock down. Entire countries under house arrest. We are living a historic moment.
How are you dealing with things? I have all my supplies to shelter in place as I am high risk. I have a face mask should I need to go to get an Rx or some fresh fruit. My shop opening is delayed for the safety of myself, my employees, and my customers. I'm keeping in touch with family and friends via social media. And yes, I'm making and taking PHONE CALLS! What?! As much of an introvert as I am, I require a certain amount of human interaction. Facetime is a blessing.
 |
| Super sexy look right here! Bahahah |
Another way I'm dealing with things is sitting outside and soaking up sun while listening to the radio. I have been running in my neighborhood, but as the heat kicks up, I do more indoor workouts. I washed my car the other day and it was so nice to be able to be out under a blue sky removing layers of pollen from my vehicle.
Of course, I've been cooking. I am a planner. I shop once a month for groceries so I have over 30 meal plans ready to roll for supper. I also plan for leftovers for lunch or another day.
I had chosen to make pot stickers this month and so I needed another 1-2 ways to use what was left in the wonton skins pack. Waste not, want not! So, I decided on crab rangoon and crispy strips for egg drop soup. Not a single wrap was wasted. As a result of planning, that 1 pack of wonton skins provided the foundation for 6 meals. Not too shabby if I do say so myself.
 |
| Cat assistant not required, but it does make it an exciting time in the kitchen |
I hope you are all staying healthy and happy. Sending you love and good eats.
Pot Stickers with Tangy Ginger Dipping Sauce
Makes 24 potstickers
1 cup cabbage (I used coleslaw mix with carrots in it)
1 cup fresh chopped spinach
1/4 cup green onion or sweet yellow onion
1 TBS soy sauce
1/2 tsp fresh, peeled ginger, grated
1/2 tsp sesame oil
dash of pepper
3 cloves garlic, minced
1/3 lb ground pork or turkey
1/4 lb peeled and devained shrimp, chopped
24 wonton wraps
1 TBS oil
2 cups chicken broth
Combine first 10 ingredients in a bowl.
Working with 1 wrapper at a time (Cover the remaining wrappers with a damp towel to prevent drying) spoon about 1 heaping tsp of filling into the center of each wrap. Moisten the edges with water. Fold in half and pinch the edges together to seal. Form 3-4 pleats along the seal. Place dumpling, seam side up on a platter. Repeat with remaining filling and wrappers to make 24 pot stickers.
 |
| By the time I got to number 6 I got it under control lol |
** You can use round gyoza skins to make this easier, but I only have the square available. I gently fold the corners in to make a half moon purse.
If you want, you may freeze half this batch. Place uncooked dumplings on a pan lined with parchment paper. Freeze until hard and store in a plastic bag until ready to use.
 |
| Ready to be frozen for later use |
Heat 1 1/2 tsp of oil in a large non-stick skillet over medium high heat.
Place 12 dumplings in the pan, seam side up. DO NOT CROWD the pan. Cook 30 seconds until brown. Add 1 cup of broth to the pan, cover and cook 5 minutes. Uncover and cook about 1 minute until liquid evaporates. Remove pot stickers from the pan. Cover and keep warm.
Repeat process with remaining dumplings. Serve with tangy ginger dipping sauce.
Tangy Ginger Dipping Sauce
1/2 cup tomato
1/3 cup chopped green onion or yellow sweet onion
1/4 cup lime juice
1/4 cup rice vinegar
1 1/2 TSB sugar
1 tsp chopped, peeled ginger
2 cloves garlic
1 jalapeno, seeded
 |
| Tangy goodness |
Throw it all in a blender and whirl until all ingredients are well chopped and mixed. Pour into a jar or small container with a lid. Allow to sit 10 minutes. Shake well and serve with dumplings or crab rangoon.
** You may choose to peel your tomato, I didn't. I like all those vitamins!
Baked Crab Rangoon
Makes 18
5 oz crab meat (I used a can, drained very well)
4.5 oz cream cheese, softened to room temp
1 green onion or 1/4 tsp onion powder
1/4 tsp garlic powder
1 tsp Worcestershire sauce
18 wonton wraps
Mix first 5 ingredients together in a small bowl. For deeper flavor, let sit for 30 minutes, covered.
Working with 1 wrap at a time, place 1 heaping tsp of filling into the center of the wonton. Wet edges.Bring up the edges toward the center to make a small purse. Pinch to seal.
 |
| Ignore my tortilla triangles, I was making chips at the same time :) |
Lay the purses on a baking sheet lined with parchment paper. Spray with olive oil. (I have a handy little spray bottle, but you can brush on if you don't have a spritz bottle) gently salt with coarse salt if desired.
Bake at 425 for 12-14 minutes until golden. Let cool a few minutes as the filling will be hot.
Bonus- if you want to make chips like I did, just cut up a corn tortilla or two and spray with oil and salt. They bake up the same time and temp as the rangoons.
Easy Baked Wonton Strips
This one is super easy!
Wonton skins
olive oil
salt
Stack several wonton skins and slice in half so you have two stacks of rectangles.
Thinly slice into strips. Toss with a tsp of olive oil.
Lay strips onto a baking sheet lined with parchment paper. Salt with coarse salt.
Bake at 425 for 7-10 minutes until golden and crispy.
Serve with your favorite soup (like egg drop soup!) or enjoy as a crunchy snack.
Store any leftovers in an airtight container.
Thursday, March 12, 2020
Blueberry-Pecan Scones
As my mom says- the baking muse is alive and well in my kitchen these days.
Yesterday I baked Reese's Chocolate Cookies with Peanut-butter chips. I will post that recipe at another time. I had done a little searching and found that Reese's has changed the recipe quantities a few times and people are all up in arms about it... So be on the lookout for what I made (hint, I just followed the recipe on the package! lol)
Today, I continued on the Cooking Light Project. Yes, you know. That project I started like 10 years ago... The recent recipes I've shared come from The Best of Cooking Light Everyday Favorites. I really enjoy a project like this for a few reasons: I get to try new foods that I would normally avoid; I get to explore new techniques in the kitchen; it's one of those projects that you can pick up at anytime and it will always be fun!
I have NEVER made a scone before. I have eaten my share, I mean it's a sweet bread. Yea. I'm all in.
These were so simple to make. They came together quickly and baked up beautifully. I used frozen blueberries that my parents picked this past berry season and GA pecans. The flavor is light and tender. For a heavier bread, it's surprisingly delicate.
I loved the fact that I had everything in my kitchen for this recipe. No special trips to the store. No random spices or equipment needed. I can tell you, these are delish right out of the oven, but they are outstanding when you let them cool completely! Yum!
Why are you still reading? Go make some scones and have a cuppa. You can thank me later. :)
Blueberry Pecan Scones
Makes 10
1/2 cup milk (I used almond milk, you can use regular 2% cows milk)
1/4 cup sugar
2 tsp grated lemon rind
1 tsp vanilla extract
1 large egg
2 cups flour
1 TBS baking powder
1/2 tsp salt
3 TBS chilled butter, diced small
1 cup fresh or frozen blueberries
1/4 cup finely chopped, toasted pecans
1 large egg white, beaten
2 TBS sugar (You can use colored sanding sugar for a fun pop of color)
Preheat oven to 375.
Combine milk, sugar, lemon, vanilla, and egg. Whisk well.
In a separate bowl, combine flour, baking powder, salt and butter. Using your preferred method, cut the butter into the flour mixture until it resembles coarse meal. I personally do this while a pastry blender, others use two knives, and of course you can always just use your hands. (I have had many children help cut butter in because they love to smoosh the butter and flour together)
Fold the berries and pecans into the flour mix. Once well coated, add milk mixture. Stir until the entire dough just comes together. It will be sticky.
Turn out onto a floured surface. Pat dough into an 8 inch circle. Cut dough into 10 wedges.
Transfer wedges to a cookie sheet lined with parchment.
Brush egg white over dough wedges. Sprinkle 2 TBS sugar over all. Bake for 18-20 minutes.
May be served immediately or at room temperature.
Yesterday I baked Reese's Chocolate Cookies with Peanut-butter chips. I will post that recipe at another time. I had done a little searching and found that Reese's has changed the recipe quantities a few times and people are all up in arms about it... So be on the lookout for what I made (hint, I just followed the recipe on the package! lol)
Today, I continued on the Cooking Light Project. Yes, you know. That project I started like 10 years ago... The recent recipes I've shared come from The Best of Cooking Light Everyday Favorites. I really enjoy a project like this for a few reasons: I get to try new foods that I would normally avoid; I get to explore new techniques in the kitchen; it's one of those projects that you can pick up at anytime and it will always be fun!
I have NEVER made a scone before. I have eaten my share, I mean it's a sweet bread. Yea. I'm all in.
These were so simple to make. They came together quickly and baked up beautifully. I used frozen blueberries that my parents picked this past berry season and GA pecans. The flavor is light and tender. For a heavier bread, it's surprisingly delicate.
I loved the fact that I had everything in my kitchen for this recipe. No special trips to the store. No random spices or equipment needed. I can tell you, these are delish right out of the oven, but they are outstanding when you let them cool completely! Yum!
Why are you still reading? Go make some scones and have a cuppa. You can thank me later. :)
Blueberry Pecan Scones
Makes 10
1/2 cup milk (I used almond milk, you can use regular 2% cows milk)
1/4 cup sugar
2 tsp grated lemon rind
1 tsp vanilla extract
1 large egg
2 cups flour
1 TBS baking powder
1/2 tsp salt
3 TBS chilled butter, diced small
1 cup fresh or frozen blueberries
1/4 cup finely chopped, toasted pecans
1 large egg white, beaten
2 TBS sugar (You can use colored sanding sugar for a fun pop of color)
Preheat oven to 375.
Combine milk, sugar, lemon, vanilla, and egg. Whisk well.
In a separate bowl, combine flour, baking powder, salt and butter. Using your preferred method, cut the butter into the flour mixture until it resembles coarse meal. I personally do this while a pastry blender, others use two knives, and of course you can always just use your hands. (I have had many children help cut butter in because they love to smoosh the butter and flour together)
Fold the berries and pecans into the flour mix. Once well coated, add milk mixture. Stir until the entire dough just comes together. It will be sticky.
Turn out onto a floured surface. Pat dough into an 8 inch circle. Cut dough into 10 wedges.
Transfer wedges to a cookie sheet lined with parchment.
Brush egg white over dough wedges. Sprinkle 2 TBS sugar over all. Bake for 18-20 minutes.
May be served immediately or at room temperature.
Tuesday, March 10, 2020
KEYS!!!!
It's time for exciting news!!! Friday, I picked up keys to my next new adventure. After a few years working for Life is Good (Love them! Check them out, for real, love them! www.lifeisgood.com) it is time for a new adventure. I've been sitting on this bit of fun information, waiting to get my keys because it didn't feel real until I had them in hand.

I accepted a super cool job opening and managing a different specialty clothing store called TINA Stephens. We will be opening late this month, so I am busy setting up shop and getting all those little details worked out. Hooray!!!
That being said, you can't work on an empty belly. I'm trying to get myself in better shape these days. I quit smoking, I go to the gym regularly, and I eat pretty lean, healthy meals. One of my favorite meals is Chicken Lo Mein. I sent it to my friend, Kate who requested the recipe be blogged.
The recipe is inspired by my Cooking Light project. The original recipe called for flank steak, but I had chicken on hand.

This isn't your grocery store, canned lo mein. This is a party in your mouth! Fresh, filling, and easy.
So, here, just for you KB, is my Chicken Lo Mein.
Chicken Lo Mein
Serves 3
4 oz uncooked linguine
1/2 tsp sesame oil
1/2 TBS olive oil
1/2 TBS minced, peeled, fresh ginger
3 cloves garlic, minced
2 cups chopped broccoli
3/4 cup sliced onion
8 oz chicken, cut into thin strips or cubes**
1 1/2 TBS soy sauce
1 TBS brown sugar
1/2 TBS oyster sauce
1/2 TBS chili paste with garlic (huy-fong chili garlic sauce is my go to brand)
sesame seeds to garnish
Cook pasta according to package directions. Drain well. Combine noodles and sesame oil, toss well to coat. Set aside.
While pasta is cooking, heat the olive oil in a large non-stick skillet over medium heat. Add ginger and garlic. Saute for 30 seconds. Add broccoli and onion. Saute 3 minutes. Add chicken, saute until done.
Add pasta to skillet. Toss well. Add soy sauce, brown sugar, oyster sauce, and chili paste. Toss well to coat all.
Garnish lightly with sesame seeds. Serve hot.
** Original recipe calls for 8oz flank steak if you prefer to make beef lo mein vs chicken.

I accepted a super cool job opening and managing a different specialty clothing store called TINA Stephens. We will be opening late this month, so I am busy setting up shop and getting all those little details worked out. Hooray!!!
That being said, you can't work on an empty belly. I'm trying to get myself in better shape these days. I quit smoking, I go to the gym regularly, and I eat pretty lean, healthy meals. One of my favorite meals is Chicken Lo Mein. I sent it to my friend, Kate who requested the recipe be blogged.
The recipe is inspired by my Cooking Light project. The original recipe called for flank steak, but I had chicken on hand.

Mmmm Asian inspired supper. Delish!
So, here, just for you KB, is my Chicken Lo Mein.
Chicken Lo Mein
Serves 3
4 oz uncooked linguine
1/2 tsp sesame oil
1/2 TBS olive oil
1/2 TBS minced, peeled, fresh ginger
3 cloves garlic, minced
2 cups chopped broccoli
3/4 cup sliced onion
8 oz chicken, cut into thin strips or cubes**
1 1/2 TBS soy sauce
1 TBS brown sugar
1/2 TBS oyster sauce
1/2 TBS chili paste with garlic (huy-fong chili garlic sauce is my go to brand)
sesame seeds to garnish
Cook pasta according to package directions. Drain well. Combine noodles and sesame oil, toss well to coat. Set aside.
While pasta is cooking, heat the olive oil in a large non-stick skillet over medium heat. Add ginger and garlic. Saute for 30 seconds. Add broccoli and onion. Saute 3 minutes. Add chicken, saute until done.
Add pasta to skillet. Toss well. Add soy sauce, brown sugar, oyster sauce, and chili paste. Toss well to coat all.
Garnish lightly with sesame seeds. Serve hot.
** Original recipe calls for 8oz flank steak if you prefer to make beef lo mein vs chicken.
Wednesday, February 26, 2020
Lauren's Favorite Tofu
Let me introduce you to the great Lauren! I met her almost 10 years ago and we just clicked. She is the kind of woman everyone should have in their lives. She is sweet, strong, compassionate, and little quirky. In my book, she's good people.
Lauren is the kind of friend who calls and says- Beep Beep! I'm in your driveway. Get in, Fool. We're going adventuring. You had a nightmare and you just can't sleep? No worries, she will answer the phone. Lost your cat at 3am? Call Lauren, she's already on her way to work and she's got your back (Breathe woman! Your cats know how to survive outside, they are cats!)
With a friend like that, it's easy to return those same favors. When you get a call and your buddy is sad- you automatically ask, do you want to come here or you want me to come to yours? When she just wants to keep your company, you scoot over on the couch and ask if she wants to stay for supper. You trust her with your worries and know they won't leave the room. She's just the best friend anyone could have.

One of Lauren's favorite meals I make is stir fried tofu. It's a fairly simple dish that I don't actually have a recipe for. I do it all by eye. But, as it is her favorite, I promised her I would at least write it down.
I love this dish because it is so versatile.The veggies can be changed up depending on the season. The sauce can be made as spicy or mild as you like. Serve it over rice or cauliflower rice. The options are limitless. I have made this as simple as just the tofu and mushrooms. It's a beautiful flavor. The secret's in the sauce...
You won't see any exact amounts, only approximations on this one. It will give you a general idea of how to prepare the dish. Don't worry, there's really no wrong way to make this!
Lauren's Favorite Tofu
Serves 2-4
1 Block of firm or extra firm tofu
1 Box (8oz) fresh mushrooms- portabella or white
Garlic- 2-3 cloves
1/4- 1/2 Small onion
1 Small zucchini, sliced and quartered
1 Small carrot, shredded
Broccoli florets
Sauce ingredients
Soy Sauce
Oyster Sauce
Pepper
Garlic chili sauce for heat
Nutritional Yeast
Sesame oil- optional and to be used VERY sparingly.
Hot rice to serve
To prepare the tofu, drain the water. Using a tea towel or similar lightweight towel gently squeeze extra liquid out of the block. Do not squeeze too hard or you will break the block.
Slice the tofu into planks and lay out on the tea towel. Cover completely and press down to remove any additional liquid hiding inside.
Cut planks into cubes approximately 1x1.
In a large saute pan, swirl the pan with a light coat of olive oil. Let heat over medium heat. Add tofu.
Allow tofu to cook, turning to brown all sides. I like to cook mine until it is fairly firm and a dark golden brown. This takes about 20 minutes on my stove top.
Add mushrooms and veggies. Saute until soft.
When veggies are done, sprinkle all with nutritional yeast. Stir well.
Time for sauce! Start with the soy sauce, I generally use about a 1/3 cup or so. Add in the oyster sauce approximately 3 TBS. Add fresh cracked pepper. Add in the garlic chili sauce- if you like it spicy, go heavy, if not use about a tsp. (Lauren likes hers red with spice, so I leave the chili sauce on the counter for her to add extra to hers) If desired, add in 1-2 DROPS (A little goes a LONG way) of the sesame oil. Stir well until all veggies and tofu are covered and the sauce has thickened slightly.
Sprinkle additional nutritional yeast over the mix.
Serve over hot rice.
Lauren is the kind of friend who calls and says- Beep Beep! I'm in your driveway. Get in, Fool. We're going adventuring. You had a nightmare and you just can't sleep? No worries, she will answer the phone. Lost your cat at 3am? Call Lauren, she's already on her way to work and she's got your back (Breathe woman! Your cats know how to survive outside, they are cats!)
With a friend like that, it's easy to return those same favors. When you get a call and your buddy is sad- you automatically ask, do you want to come here or you want me to come to yours? When she just wants to keep your company, you scoot over on the couch and ask if she wants to stay for supper. You trust her with your worries and know they won't leave the room. She's just the best friend anyone could have.

Lauren and me on the beach for an adventure!
I love this dish because it is so versatile.The veggies can be changed up depending on the season. The sauce can be made as spicy or mild as you like. Serve it over rice or cauliflower rice. The options are limitless. I have made this as simple as just the tofu and mushrooms. It's a beautiful flavor. The secret's in the sauce...
You won't see any exact amounts, only approximations on this one. It will give you a general idea of how to prepare the dish. Don't worry, there's really no wrong way to make this!
Lauren's Favorite Tofu
Serves 2-4
1 Block of firm or extra firm tofu
1 Box (8oz) fresh mushrooms- portabella or white
Garlic- 2-3 cloves
1/4- 1/2 Small onion
1 Small zucchini, sliced and quartered
1 Small carrot, shredded
Broccoli florets
Sauce ingredients
Soy Sauce
Oyster Sauce
Pepper
Garlic chili sauce for heat
Nutritional Yeast
Sesame oil- optional and to be used VERY sparingly.
Hot rice to serve
To prepare the tofu, drain the water. Using a tea towel or similar lightweight towel gently squeeze extra liquid out of the block. Do not squeeze too hard or you will break the block.
Slice the tofu into planks and lay out on the tea towel. Cover completely and press down to remove any additional liquid hiding inside.
Cut planks into cubes approximately 1x1.
In a large saute pan, swirl the pan with a light coat of olive oil. Let heat over medium heat. Add tofu.
Allow tofu to cook, turning to brown all sides. I like to cook mine until it is fairly firm and a dark golden brown. This takes about 20 minutes on my stove top.
Add mushrooms and veggies. Saute until soft.
When veggies are done, sprinkle all with nutritional yeast. Stir well.
Time for sauce! Start with the soy sauce, I generally use about a 1/3 cup or so. Add in the oyster sauce approximately 3 TBS. Add fresh cracked pepper. Add in the garlic chili sauce- if you like it spicy, go heavy, if not use about a tsp. (Lauren likes hers red with spice, so I leave the chili sauce on the counter for her to add extra to hers) If desired, add in 1-2 DROPS (A little goes a LONG way) of the sesame oil. Stir well until all veggies and tofu are covered and the sauce has thickened slightly.
Sprinkle additional nutritional yeast over the mix.
Serve over hot rice.
Monday, February 24, 2020
Super Soup
First things first! Today is my Grandma Spranger's 81st Birthday. So let me take a moment to wish her a fantastic day! I am so glad I have had the opportunity know my Gram. She raised 8 wonderful children, was a faithful and loving wife to my grandfather, a devout Catholic, and man, can she cook!
When I smell root vegetables, I am automatically transported to her root cellar. It's a welcome smell- a dark, damp, musky onion skin smell. Of course there were also potatoes, carrots, and radishes as well. There always oodles of melons as well- musk and honey dew. It's a happy place for me. There were always jars of my grandpa's fruit lining the shelves waiting for their use over the winter. It was truly a place filled with love and care. You could see how much time and effort went into each and every thing in that room.
One thing I have always associated with her is sour dough bread. For as far back as I can remember, Gram always had sour dough starter on her counter. There was always a fresh loaf of bread or buns ready to go into the oven. She once told me that her original starter came from one of her family members in Indiana. I don't know if you've ever had to take care of sour dough starter, but that's like a child unto itself.... And this remarkable woman kept this starter fed, loved, and watered. Kudos to her!!!

In a large saucepan, saute the onion and celery in butter until tender.
Add the chicken and beef broth. Stir in the baking soda.
When I smell root vegetables, I am automatically transported to her root cellar. It's a welcome smell- a dark, damp, musky onion skin smell. Of course there were also potatoes, carrots, and radishes as well. There always oodles of melons as well- musk and honey dew. It's a happy place for me. There were always jars of my grandpa's fruit lining the shelves waiting for their use over the winter. It was truly a place filled with love and care. You could see how much time and effort went into each and every thing in that room.
One thing I have always associated with her is sour dough bread. For as far back as I can remember, Gram always had sour dough starter on her counter. There was always a fresh loaf of bread or buns ready to go into the oven. She once told me that her original starter came from one of her family members in Indiana. I don't know if you've ever had to take care of sour dough starter, but that's like a child unto itself.... And this remarkable woman kept this starter fed, loved, and watered. Kudos to her!!!

Isn't she just the cutest thing ever?!
Next up is my sister by choice, Nena (Beans) who still lives back in MN. Nena has been part of my family since the 3rd grade. I am so happy to have her in my life. Her kids are my nieces and nephews
and I adore them.

Being silly last winter during one of my visits
This time of year is made for a hearty warm bowl of love to fight the cold temperatures. I adore her soup collection. She's got chicken and dumplings, broccoli and cheddar, wild rice and chicken, and so many more. Today I am going to share of my favorites of hers.
If you like a Reuben sandwich, you will love this soup! Its hearty and filling, the perfect thing for a cold day.
So get out your stock pots, kids. It's time to make some soup!
Bean's Reuben Soup
1/2 cup chopped onion
1/2 cup sliced celery
2 TBS butter
1 cup chicken broth
1 cup beef broth
1/2 tsp baking soda
2 TBS corn starch
2 TBS water
3/4 cup sauerkraut
2 cups sour cream
2 cups corned beef
1 cup shredded Swiss cheese
Drain the sauerkraut. Chop the cooked corned beef.
Combine starch and water. Stir into the broth mixture. Bring to a boil and simmer 2 minutes, stir occasionally.
Reduce the heat. Add kraut, sour cream, and corned beef. Simmer 15 minutes, stirring occasionally to prevent sticking. Do NOT let boil, the sour cream will split if you have the heat too high.
Add cheese. Stir until melted. Salt and pepper to taste. Serve with a thick slice of french bread or sour dough.
Sunday, February 23, 2020
Spaghetti Fantastic-O
Growing up my mom made supper pretty much every night. She worked all day, came home, and cooked for the family. (Don't be mislead- Dad cooked too, and still does!)
This was always one of my favorite things about growing up. Not just a good home cooked meal, but the ritual. See, we helped our mom make supper.
Let me backtrack for just a moment. I enjoy routine. Structure makes me happy because I like to know what to expect. So from kindergarten through my senior year of high school I was not sad that I knew what was going to happen from 7am-5:30pm M-F. I was woken up by alarm - either my radio clicking on or my dad singing to me. Showered, ate breakfast, waited for the bus and went to school. At 3:10 I rode the bus home for almost an hour. Go in the house, get a snack (You can have a Little Debbie or a bagel with cheese, or if Dad made cookies, you can have 2 cookies.) then do homework. By the time homework was done, it was time to make supper.
Mom would tell us what we were making and we would get the ingredients out, measure, chop, stir etc. Then, here's the best part. Mom asked us about our day. Everyday. So we got to talk and tell her what was great, what we felt needed improvement, and of course tell her the latest drama.
Then, we'd set the table and plate up supper. We sat together as a family. We prayed for God's blessing on our food and our lives. And we talked. This, to me, is still the best way to grow together and support one another.
What we made for supper changed over the years, but the central theme never did: Good food, fellowship, and family.
I have an entire cookbook of favorite recipes from my childhood. Things Mom made, things Dad made, my friend's parent's recipes for dishes I loved. My mom hooked me up when I moved out!
Now, I have 2-3 more cookbooks I've filled in with new favorites from family suppers. One of my mom's favorites is Spaghetti Fantastic. I call it Fantastic-o because it's fun to say LOL. Mom said she could eat this everyday. I believe her! It's very easy, quick, and versatile. You can easily swap out any of the veggies for what you have on hand or what's in season.
Whatever you cook, do it with love. And share it with someone you care about. <3 div="">
Spaghetti Fanastic-O
Serves 2
4oz chicken breast
1 1/2 cups chicken broth
4oz spaghetti (NOT angel hair), DRY
2 cloves garlic, minced
1/8 tsp red pepper flakes
1 tsp dried oregano, crushed
1 large sprig fresh basil, chopped
1/2 cup fresh mushrooms
1 large tomato, chopped OR 7oz canned diced tomatoes
1/2 cup zucchini or green beans, cut into bite size pieces
1/2 TBS olive oil
2 TBS Parmesan Cheese
Dice chicken breast. Brown in a large skillet.
Add all ingredients except zucchini and Parmesan cheese into the pot. (If using green beans instead of zucchini, add them in now with all other ingredients) COVER and bring to a boil. Reduce heat and cook 10 minutes.
Uncover and continue cooking until most of the liquid is absorbed. Add zucchini last five minutes of cook time.
Season with salt and pepper. Top with Parmesan cheese. Serve.
Saturday, February 22, 2020
The Return
So, here we are again.
I've had far too many lessons learned, recipe successes and failures, moves, new business opportunities, and adventures to discuss in one blog.
Rather than try to fill in the blanks, I'm just going to pick up right where I left off.
This month has been full of unpleasant surprises and challenges, but such is life right? Rather than let life get me down, I've stood up, dusted myself off, and remembered where my strength comes from. I find myself in near constant prayer. Answering phone calls from the elite few who have my number. And going back to basics in the kitchen. This is who I am. For the first time in my adult life, I'm comfortable with exactly who I am.
I have a friend who often asks how I live so frugally. A lifetime of practice? Yes, it's a question in my mind. I was raised in a small Midwest town and we have always lived this way. Why spend money you don't have to? Don't use more toilet paper than you need (I have a 3-4 square rule in my house LOL). Use real dishes (You will NOT find any paper or plastic dishes in my kitchen). Cook from scratch. Don't eat out. If you live somewhere you can fish, crab, or hunt- take advantage of it. Grow a garden, even if it's just a patio garden in pots. And more importantly? Don't spend more than you make.
That being said, I'm also a firm believer in using what you have on hand. I have had this sad banana sitting on my counter for over a week. The cats have poked at it, nibbled the stem, played hockey with it on the island. I couldn't let this poor banana go out this way. So I got to hunting down a recipe. I made one banana blondies. They were a cute little snack. Soft and less dense than banana bread. But what blew the flip flops off my feet was the brown butter icing that went over the top of the blondies. I would put that icing on pretty much any cake, bars, rice crispy bars, a spoon.... I could go on.
Instead of drooling all over my keyboard, I will just share the recipe. Enjoy!
Brown Butter Icing
Makes enough for a 9x9 cake
1/4 cup butter
6 TBS light brown sugar
2 TBS milk or cream (I used unsweetened original almond milk)
dash of salt
2 tsp good quality vanilla
1 cup powdered sugar
In a medium saucepan, melt the butter and cook until a nice amber color. Stir constantly to keep butter from burning!
When butter is desired color, add brown sugar, milk, and salt. Stir. Bring to a boil. Remove from heat. Cool caramel mix for 15 minutes.
Whisk in vanilla and powdered sugar.
Spread over dessert of choice, let icing set before slicing.
I've had far too many lessons learned, recipe successes and failures, moves, new business opportunities, and adventures to discuss in one blog.
Rather than try to fill in the blanks, I'm just going to pick up right where I left off.
This month has been full of unpleasant surprises and challenges, but such is life right? Rather than let life get me down, I've stood up, dusted myself off, and remembered where my strength comes from. I find myself in near constant prayer. Answering phone calls from the elite few who have my number. And going back to basics in the kitchen. This is who I am. For the first time in my adult life, I'm comfortable with exactly who I am.
I have a friend who often asks how I live so frugally. A lifetime of practice? Yes, it's a question in my mind. I was raised in a small Midwest town and we have always lived this way. Why spend money you don't have to? Don't use more toilet paper than you need (I have a 3-4 square rule in my house LOL). Use real dishes (You will NOT find any paper or plastic dishes in my kitchen). Cook from scratch. Don't eat out. If you live somewhere you can fish, crab, or hunt- take advantage of it. Grow a garden, even if it's just a patio garden in pots. And more importantly? Don't spend more than you make.
That being said, I'm also a firm believer in using what you have on hand. I have had this sad banana sitting on my counter for over a week. The cats have poked at it, nibbled the stem, played hockey with it on the island. I couldn't let this poor banana go out this way. So I got to hunting down a recipe. I made one banana blondies. They were a cute little snack. Soft and less dense than banana bread. But what blew the flip flops off my feet was the brown butter icing that went over the top of the blondies. I would put that icing on pretty much any cake, bars, rice crispy bars, a spoon.... I could go on.
Instead of drooling all over my keyboard, I will just share the recipe. Enjoy!
Brown Butter Icing
Makes enough for a 9x9 cake
1/4 cup butter
6 TBS light brown sugar
2 TBS milk or cream (I used unsweetened original almond milk)
dash of salt
2 tsp good quality vanilla
1 cup powdered sugar
In a medium saucepan, melt the butter and cook until a nice amber color. Stir constantly to keep butter from burning!
When butter is desired color, add brown sugar, milk, and salt. Stir. Bring to a boil. Remove from heat. Cool caramel mix for 15 minutes.
Whisk in vanilla and powdered sugar.
Spread over dessert of choice, let icing set before slicing.
Thursday, September 20, 2012
Butternut Squash Pasta
The weather has been cool and rainy here in southern Georgia. As the weather changes, I start craving those fall favorites. My brother shared a recipe with me last year for butternut squash ravioli. I have made gluten free ravioli wrappers, but they are very tedious. A quick and easy fix? Take the filling and toss it with gluten free pasta.
When he made it, Adam made his own fresh ricotta cheese. It was warm and creamy, the consistency was less grainy than store bought ricotta. I fell in love with it. If you have the time, I recommend making your own.
This recipe is very basic, but has all the flavors of fall that I love. Roasted root vegetables, salty cheese, dried cranberries, and earthy sage. The leaves may not change here, but my palette certainly knows it's time for fall!
Here's to you and your culinary adventures my friends. Cheers!
Butternut Squash Pasta
1 small butternut squash
1 yellow onion
2 cloves garlic
1-2 tsp olive oil
salt and pepper
1 tsp nutmeg
1 cup ricotta cheese
1 egg
1/4 cup butter
2-3 fresh sage leaves
1/4 cup salted pepitas (shelled pumpkin seeds)
1/3 cup freshly shredded Parmesan cheese
1/8- 1/4 cup dried cranberries
Gluten free pasta, cooked according to package directions
Preheat oven to 400.
Peel and dice butternut squash. Quarter onion. Toss squash, onion, and garlic in olive oil. Season with salt and pepper. Turn onto a prepared sheet pan. Roast 35-45 minutes until golden brown and softened.
Puree vegetables in a food processor or blender.
Combine 1 cup puree*, ricotta cheese, and egg. Warm over low heat until slightly thickened. Stir in nutmeg. Set aside, keep warm.
Cut sage leaves into thin strips. In a small skillet, brown butter. Add sage and allow to sit for 1-2 minutes.
Toss squash and sage butter with pasta. Sprinkle with cranberries, Parmesan cheese, and pepitas. Season with salt and pepper to taste.
* You will have more than one cup of puree from the vegetables. It's great as a thickener in soup or frozen for another batch of this pasta.
When he made it, Adam made his own fresh ricotta cheese. It was warm and creamy, the consistency was less grainy than store bought ricotta. I fell in love with it. If you have the time, I recommend making your own.
This recipe is very basic, but has all the flavors of fall that I love. Roasted root vegetables, salty cheese, dried cranberries, and earthy sage. The leaves may not change here, but my palette certainly knows it's time for fall!
Here's to you and your culinary adventures my friends. Cheers!
Butternut Squash Pasta
1 small butternut squash
1 yellow onion
2 cloves garlic
1-2 tsp olive oil
salt and pepper
1 tsp nutmeg
1 cup ricotta cheese
1 egg
1/4 cup butter
2-3 fresh sage leaves
1/4 cup salted pepitas (shelled pumpkin seeds)
1/3 cup freshly shredded Parmesan cheese
1/8- 1/4 cup dried cranberries
Gluten free pasta, cooked according to package directions
Preheat oven to 400.
Peel and dice butternut squash. Quarter onion. Toss squash, onion, and garlic in olive oil. Season with salt and pepper. Turn onto a prepared sheet pan. Roast 35-45 minutes until golden brown and softened.
Puree vegetables in a food processor or blender.
Combine 1 cup puree*, ricotta cheese, and egg. Warm over low heat until slightly thickened. Stir in nutmeg. Set aside, keep warm.
Cut sage leaves into thin strips. In a small skillet, brown butter. Add sage and allow to sit for 1-2 minutes.
Toss squash and sage butter with pasta. Sprinkle with cranberries, Parmesan cheese, and pepitas. Season with salt and pepper to taste.
* You will have more than one cup of puree from the vegetables. It's great as a thickener in soup or frozen for another batch of this pasta.
Tuesday, August 21, 2012
Quick Banana Bread
I am a fan of banana bread. It screams comfort to me. Jon hasn't been feeling well, so I made a big pot of chicken and vegetable soup and a loaf of banana bread.
I wanted to be able to eat the banana bread, so I opted to try a new gluten free recipe. The one I used came from of my Betty Crocker gluten free cook books. I had to make a few substitutions on the fly because I didn't have quite enough gluten free Bisquick. But, lucky for me, I am a fairly savvy cook.
The results were wonderful! It was moist and tender. I would like a little stronger banana flavor, but Jon said it was perfect.
This would be a great holiday bread for brunch or for a sweet treat. It's perfect for those gluten eaters in your life because it uses gf flours that don't have strong flavors. My husband who is a big fan of gluten filled treats asked why I was eating the bread- he didn't know it was gluten free until he was told. That is a huge success in my book!
Here's to you and your culinary adventures!
Quick Banana Bread
Makes 1 loaf
1/2 cup butter, softened
1 cup sugar
1 cup mashed, ripe bananas
2 eggs, beaten
1/2 cup buttermilk*
1 1/2 cups gluten free Bisquick**
1 1/4 cups brown rice flour
1/4 cup tapioca flour
1/2 tsp xanthan gum
1/4 tsp baking powder
1/4 tsp pumpkin spice
1/2 tsp cinnamon
1/8 tsp salt
Preheat oven to 350. Spray the bottom of a 9x5 loaf pan with cooking spray.
In a large bowl, cream together butter and sugar. Add banana,eggs and buttermilk. Mix well.
In a separate bowl combine Bisquick, rice flour, tapioca flour, xanthan gum, baking powder, spices and salt.
Add dry ingredients to the banana mixture. Stir to combine. Pour into the prepared loaf pan.
Bake for 1 hour to 1 hour and 10 minutes until a toothpick inserted into the middle comes out clean. Cool 10 minutes. Run a knife around the edge of the pan to loosen the loaf. Remove the bread from the pan and place on a cooling rack to cool completely.
* If you don't have buttermilk- take 1/2 cup milk add 1/2 TBS lemon juice or vinegar. Stir. Let sit for 5 minutes. Stir again and use as directed.
** You can use 2 1/2 cups of gluten free Bisquick. If you do, omit the rice flour, tapioca flour, and xanthan gum.
I wanted to be able to eat the banana bread, so I opted to try a new gluten free recipe. The one I used came from of my Betty Crocker gluten free cook books. I had to make a few substitutions on the fly because I didn't have quite enough gluten free Bisquick. But, lucky for me, I am a fairly savvy cook.
The results were wonderful! It was moist and tender. I would like a little stronger banana flavor, but Jon said it was perfect.
This would be a great holiday bread for brunch or for a sweet treat. It's perfect for those gluten eaters in your life because it uses gf flours that don't have strong flavors. My husband who is a big fan of gluten filled treats asked why I was eating the bread- he didn't know it was gluten free until he was told. That is a huge success in my book!
Here's to you and your culinary adventures!
Quick Banana Bread
Makes 1 loaf
1/2 cup butter, softened
1 cup sugar
1 cup mashed, ripe bananas
2 eggs, beaten
1/2 cup buttermilk*
1 1/2 cups gluten free Bisquick**
1 1/4 cups brown rice flour
1/4 cup tapioca flour
1/2 tsp xanthan gum
1/4 tsp baking powder
1/4 tsp pumpkin spice
1/2 tsp cinnamon
1/8 tsp salt
Preheat oven to 350. Spray the bottom of a 9x5 loaf pan with cooking spray.
In a large bowl, cream together butter and sugar. Add banana,eggs and buttermilk. Mix well.
In a separate bowl combine Bisquick, rice flour, tapioca flour, xanthan gum, baking powder, spices and salt.
Add dry ingredients to the banana mixture. Stir to combine. Pour into the prepared loaf pan.
Bake for 1 hour to 1 hour and 10 minutes until a toothpick inserted into the middle comes out clean. Cool 10 minutes. Run a knife around the edge of the pan to loosen the loaf. Remove the bread from the pan and place on a cooling rack to cool completely.
* If you don't have buttermilk- take 1/2 cup milk add 1/2 TBS lemon juice or vinegar. Stir. Let sit for 5 minutes. Stir again and use as directed.
** You can use 2 1/2 cups of gluten free Bisquick. If you do, omit the rice flour, tapioca flour, and xanthan gum.
Saturday, August 4, 2012
Roasted Potato Salad
I love German potato salad. Jon hasn't ever been a huge fan, he says it's too sharp for him. I on the other hand, love the vinegary bite.
I found this recipe a few weeks ago- it's a gentler version of the traditional dish. Jon fell in love with it. At the end of the meal he stated, "Let's do this one again, soon!"
I had some of the leftovers the next afternoon for lunch. It was delicious. It rewarmed wonderfully.
We served it with grilled chicken breasts and fresh veg.
There you have it, quick and easy. And yea. Bacon. Who doesn't love bacon?
Here's to you and your culinary adventures friends! Cheers!
Roasted Potato Salad
2 lbs baby red potatoes, halved or quartered depending on size
2 TBS olive oil, divided
1 large sweet onion, diced
1/2 TBS sugar
6 strips apple smoked bacon, uncured, chopped into small pieces
salt and pepper to taste
Dressing:
4 TBS red wine vinegar
3 tsp sugar
1-2 tsp Dijon mustard (I used French's dijon with chardonnay)
¼ tsp Italian seasoning
3 TBS reserved, warm bacon drippings
1 TBS olive oil
salt and pepper to taste
Preheat the oven to 400 degrees.
In a large bowl, add the halved (or quartered) potatoes along with the olive oil, salt, and pepper. Toss well to combine.
Spray a foil lined baking sheet with cooking spray, and turn the baby potatoes out onto the baking sheet. Roast for 35-40, or until golden-brown and tender; while potatoes roast, crisp the bacon and onion.
In a medium-large non-stick pan set over medium heat, add a tsp or two of olive oil; when hot, add the onion and 1/2 TBS sugar. Cook/caramelize the onions over medium for about 10 minutes, or until a golden, caramel color, and softened. Remove from heat. Set aside and keep warm.
To the same pan set over medium heat, cook the bacon pieces until brown and crispy, then remove them with a slotted spoon and onto a paper towel to drain; reserve 3 tablespoons of the bacon drippings. Set aside to use in the vinaigrette; keep the drippings warm.
Prepare the dressing in a mason jar or container with a tight fitting lid. Combine all the dressing ingredients. Shake well to combine.
Add the warm, roasted baby potatoes to a large bowl, and then add the onion, bacon, and vinaigrette. Toss well to completely combine, making sure that all of the potatoes are well dressed. Serve warm.
I found this recipe a few weeks ago- it's a gentler version of the traditional dish. Jon fell in love with it. At the end of the meal he stated, "Let's do this one again, soon!"
I had some of the leftovers the next afternoon for lunch. It was delicious. It rewarmed wonderfully.
We served it with grilled chicken breasts and fresh veg.
There you have it, quick and easy. And yea. Bacon. Who doesn't love bacon?
Here's to you and your culinary adventures friends! Cheers!
Roasted Potato Salad
2 lbs baby red potatoes, halved or quartered depending on size
2 TBS olive oil, divided
1 large sweet onion, diced
1/2 TBS sugar
6 strips apple smoked bacon, uncured, chopped into small pieces
salt and pepper to taste
Dressing:
4 TBS red wine vinegar
3 tsp sugar
1-2 tsp Dijon mustard (I used French's dijon with chardonnay)
¼ tsp Italian seasoning
3 TBS reserved, warm bacon drippings
1 TBS olive oil
salt and pepper to taste
Preheat the oven to 400 degrees.
In a large bowl, add the halved (or quartered) potatoes along with the olive oil, salt, and pepper. Toss well to combine.
Spray a foil lined baking sheet with cooking spray, and turn the baby potatoes out onto the baking sheet. Roast for 35-40, or until golden-brown and tender; while potatoes roast, crisp the bacon and onion.
In a medium-large non-stick pan set over medium heat, add a tsp or two of olive oil; when hot, add the onion and 1/2 TBS sugar. Cook/caramelize the onions over medium for about 10 minutes, or until a golden, caramel color, and softened. Remove from heat. Set aside and keep warm.
To the same pan set over medium heat, cook the bacon pieces until brown and crispy, then remove them with a slotted spoon and onto a paper towel to drain; reserve 3 tablespoons of the bacon drippings. Set aside to use in the vinaigrette; keep the drippings warm.
Prepare the dressing in a mason jar or container with a tight fitting lid. Combine all the dressing ingredients. Shake well to combine.
Add the warm, roasted baby potatoes to a large bowl, and then add the onion, bacon, and vinaigrette. Toss well to completely combine, making sure that all of the potatoes are well dressed. Serve warm.
Wednesday, July 25, 2012
Crock Pot Pork Roast
Jon and I had a beautiful day off together earlier this week. We slept in, had a leisurely morning, and headed to the beach.
Before we left for some fun in the sun, I threw a pork roast into the crock so we'd have supper when we came home. It turned out so moist and flavorful! No sauce was needed for this star dish. And, bonus- I didn't have to heat up the house when it was 100+ degrees outside!
A few snapshots of our day at the beach (click to see the larger image):
There you have it- a glimpse of our day at the beach. We checked on our nest, no signs of babies yet. But the Georgia Sea Turtle Center posted a photo this morning of a hatch-ling. It would have been from one of the very first nests of the season. Fingers are still crossed our little turtle kids hatch and make their way home to the water!
When we arrived home, the roast smelled fantastic. I shredded the meat and served with mashed potatoes and fresh green beans. It was delish. A great meal to end a great day with my sweetheart.
Here's to you and your culinary adventures, friends. Cheers!
Crock Pot Pork Roast
3lb pork roast with good marbling and a decent fat layer
2/3 cup grated parmesan cheese
1/2 cup honey
3 TBS soy sauce
2 TBS dry basil
2 TBS minced garlic
2 TBS olive oil
1/4 cup hickory bbq sauce
salt and pepper to taste
Spray the insert of the crock pot. Lay the pork roast in, fat side up.
Whisk together the remaining ingredients. Pour over pork roast. Cover and cook on low for 7 hours.
Remove from cooker. Allow to cool slightly.
Trim and discard any large pieces of remaining fat. You want to leave some fat on when you shred the meat because it keeps it nice and tender. Discard juices from the crock pot once cooled.
Shred meat using two forks. Serve with additional bbq sauce if desired.
Before we left for some fun in the sun, I threw a pork roast into the crock so we'd have supper when we came home. It turned out so moist and flavorful! No sauce was needed for this star dish. And, bonus- I didn't have to heat up the house when it was 100+ degrees outside!
A few snapshots of our day at the beach (click to see the larger image):
 |
| Do you spy a giant 5 foot spider web? |
 |
| There are a ton of these Golden Silk Orb-Weaver spiders here. It's more commonly called a banana spider. |
 |
| Pelican- we saw several of them this day. |
 |
| After two years, we finally pulled out a map to find out what the land mass in the distance is. It's Cumberland Island! You know, where we saw the horses on my birthday. :) |
 |
| First attempt at a photo on the beach- a little breezy for me... |
 | ||
| Second attempt on the boardwalk was much more successful. |
There you have it- a glimpse of our day at the beach. We checked on our nest, no signs of babies yet. But the Georgia Sea Turtle Center posted a photo this morning of a hatch-ling. It would have been from one of the very first nests of the season. Fingers are still crossed our little turtle kids hatch and make their way home to the water!
When we arrived home, the roast smelled fantastic. I shredded the meat and served with mashed potatoes and fresh green beans. It was delish. A great meal to end a great day with my sweetheart.
Here's to you and your culinary adventures, friends. Cheers!
Crock Pot Pork Roast
3lb pork roast with good marbling and a decent fat layer
2/3 cup grated parmesan cheese
1/2 cup honey
3 TBS soy sauce
2 TBS dry basil
2 TBS minced garlic
2 TBS olive oil
1/4 cup hickory bbq sauce
salt and pepper to taste
Spray the insert of the crock pot. Lay the pork roast in, fat side up.
Whisk together the remaining ingredients. Pour over pork roast. Cover and cook on low for 7 hours.
Remove from cooker. Allow to cool slightly.
Trim and discard any large pieces of remaining fat. You want to leave some fat on when you shred the meat because it keeps it nice and tender. Discard juices from the crock pot once cooled.
Shred meat using two forks. Serve with additional bbq sauce if desired.
Friday, July 20, 2012
Taco-Chili Skillet
This recipe evolved from Mom's taco chili recipe. I was really longing for the flavors of her chili, but it's been blisteringly hot.
Jon mentioned the other day that he missed hamburger helper. Then it hit me- add some pasta to the chili and thicken the sauce.
It was a home run. :) Super easy and delicious.
I hope your summer is going well and you are staying cool! And hopefully, you haven't been carried away by a waterspout like the one we had in our neck of the woods this week:

A local dolphin tour business re-posted this photo of the waterspout. I couldn't tell you who took the photo, but it's a great shot of the action. I didn't actually get to see this water tornado, but the girls at work could see it from the parking lot. They tell me it was so clear and clean it was unbelievable.
Jon and I go to the beach often and check up on our turtle babies. They should be hatching some day soon. Hopefully we will get to see them make their way to the Big Blue! If we do get the opportunity to see the miracle, I will try to capture it on film. So fingers crossed and prayers said :)
Here's to you and your culinary adventures, friends. Cheers!
Taco-Chili Skillet
Serves 6-8
8 oz pasta (I used gf shells)
1 lb lean ground beef
1 onion, diced
2 cloves garlic, minced
1 envelope taco seasoning + 2-3 tsp chili powder + 1 tsp cumin
1-2 TBS dry ranch dressing mix *
1 can whole corn, drained
1 can light kidney beans, drained
1 can rotel tomatoes
1/3 cup chunky salsa
1/4-1/3 cup beef stock*
Shredded taco cheese, optional
Sour cream, optional
Cook pasta in lightly salted water for 7-9 minutes until almost done. Drain well. Set aside.
Brown ground beef with onion and garlic. Season as desired with salt and pepper. I used Adobo seasoning.
Add remaining ingredients through beef stock. Simmer, uncovered for 10 minutes until thickened. Gently stir in pasta.
Serve with a garnish of cheese and sour cream.
* As always, if you are gf- be sure you are using gf products. Just a heads up, some brands of dry dressing mix and beef stock contain gluten. Read your labels carefully :)
Jon mentioned the other day that he missed hamburger helper. Then it hit me- add some pasta to the chili and thicken the sauce.
It was a home run. :) Super easy and delicious.
I hope your summer is going well and you are staying cool! And hopefully, you haven't been carried away by a waterspout like the one we had in our neck of the woods this week:

A local dolphin tour business re-posted this photo of the waterspout. I couldn't tell you who took the photo, but it's a great shot of the action. I didn't actually get to see this water tornado, but the girls at work could see it from the parking lot. They tell me it was so clear and clean it was unbelievable.
Jon and I go to the beach often and check up on our turtle babies. They should be hatching some day soon. Hopefully we will get to see them make their way to the Big Blue! If we do get the opportunity to see the miracle, I will try to capture it on film. So fingers crossed and prayers said :)
Here's to you and your culinary adventures, friends. Cheers!
Taco-Chili Skillet
Serves 6-8
8 oz pasta (I used gf shells)
1 lb lean ground beef
1 onion, diced
2 cloves garlic, minced
1 envelope taco seasoning + 2-3 tsp chili powder + 1 tsp cumin
1-2 TBS dry ranch dressing mix *
1 can whole corn, drained
1 can light kidney beans, drained
1 can rotel tomatoes
1/3 cup chunky salsa
1/4-1/3 cup beef stock*
Shredded taco cheese, optional
Sour cream, optional
Cook pasta in lightly salted water for 7-9 minutes until almost done. Drain well. Set aside.
Brown ground beef with onion and garlic. Season as desired with salt and pepper. I used Adobo seasoning.
Add remaining ingredients through beef stock. Simmer, uncovered for 10 minutes until thickened. Gently stir in pasta.
Serve with a garnish of cheese and sour cream.
* As always, if you are gf- be sure you are using gf products. Just a heads up, some brands of dry dressing mix and beef stock contain gluten. Read your labels carefully :)
Friday, July 6, 2012
Summer Squash Casserole
It's been in the low hundreds here this week. The heat index climbed up into the upper 120's. We finally had a break in the weather around Wednesday- it was only 89 with a heat index of 97 when I got home the other night. I decided it was my very narrow window to make a new recipe- summer squash casserole.
I am so happy I made good use of that opening! This dish turned out really good. I served it with grilled pork chops and fresh tomatoes. And, like most casseroles, it was even better the second day.
I think this would make a great accompaniment to a chicken dish- perhaps chicken piccata. This is a definite keeper that we will revisit this fall.
Here's to you and your culinary adventures, friends. Cheers!
Summer Squash Casserole
Serves 6
2 lbs summer squash, sliced about 1/4 inch thick
2 TBS butter, divided
1/2 large sweet onion
2 cloves garlic, minced
1/2 cup gluten free bread crumbs
3/4 cup shredded Parmesan cheese
1 cup shredded cheddar cheese
1/4 cup fresh chopped chives
1/4 cup fresh chopped parsley
1/2 cup sour cream
1 egg
salt and pepper
1/2 cup crushed corn flakes
1/4 tsp garlic powder
Preheat oven to 350.
Bring a large pot of water to a boil. Add squash. Simmer for about 8 minutes, until squash begins to soften. Drain well. Set aside.
In the same pot, add 1 TBS butter, garlic,and onion. Saute until onion begins to soften and starts to turn translucent. Remove from heat.
Add bread crumbs, Parmesan, cheddar, chives, parsley, sour cream, egg, and seasonings. Stir until well combined.
Fold in squash. Pour into a prepared 8x8 or 11x7 casserole dish.
Melt remaining tablespoon of butter. Combine with corn flakes and garlic powder. Spread evenly over squash.
Bake, uncovered for 35 minutes.
Let cool 5 minutes before serving.
I am so happy I made good use of that opening! This dish turned out really good. I served it with grilled pork chops and fresh tomatoes. And, like most casseroles, it was even better the second day.
I think this would make a great accompaniment to a chicken dish- perhaps chicken piccata. This is a definite keeper that we will revisit this fall.
Here's to you and your culinary adventures, friends. Cheers!
Summer Squash Casserole
Serves 6
2 lbs summer squash, sliced about 1/4 inch thick
2 TBS butter, divided
1/2 large sweet onion
2 cloves garlic, minced
1/2 cup gluten free bread crumbs
3/4 cup shredded Parmesan cheese
1 cup shredded cheddar cheese
1/4 cup fresh chopped chives
1/4 cup fresh chopped parsley
1/2 cup sour cream
1 egg
salt and pepper
1/2 cup crushed corn flakes
1/4 tsp garlic powder
Preheat oven to 350.
Bring a large pot of water to a boil. Add squash. Simmer for about 8 minutes, until squash begins to soften. Drain well. Set aside.
In the same pot, add 1 TBS butter, garlic,and onion. Saute until onion begins to soften and starts to turn translucent. Remove from heat.
Add bread crumbs, Parmesan, cheddar, chives, parsley, sour cream, egg, and seasonings. Stir until well combined.
Fold in squash. Pour into a prepared 8x8 or 11x7 casserole dish.
Melt remaining tablespoon of butter. Combine with corn flakes and garlic powder. Spread evenly over squash.
Bake, uncovered for 35 minutes.
Let cool 5 minutes before serving.
Saturday, June 30, 2012
Raspberry Creamsicles
It is hot here this week. The mercury hit 102 with a heat index of 125 today.Yesterday was much of the same.
I needed to cool down after a hard day of work and a cold shower wasn't going to do it. Mostly because the ground water is no longer cool. I can take a shower with the hot water off and the water is still lukewarm. Not super refreshing.
I wanted a frozen treat that would be creamy and satisfy my sweet tooth without being heavy. Cool Whip has a ton of recipes out there so I thought I would try one.
I loved these! Light, refreshing, and just enough sweet to satisfy.
If you don't have Popsicle molds, you can use little Dixie cups with a Popsicle stick.
Hope your summer is going well! Stay cool and enjoy the sunshine :)
Here's to you and your culinary adventures, friends. Cheers!
Raspberry Creamsicles
4 oz cool whip (light, regular, sugar free, whatever suits your fancy)
1/2 cup crushed pineapple
1 cup fresh raspberries
1 small box sugar free instant vanilla pudding mix
Combine cool whip and pudding mix until well mixed. Fold in pineapple and berries. Spoon evenly into popsicle molds.
Freeze at least 4 hours.
To remove from plastic molds- run the mold under warm water for 10-20 seconds to loosen. If you use paper cups, simply peel the paper off.
I needed to cool down after a hard day of work and a cold shower wasn't going to do it. Mostly because the ground water is no longer cool. I can take a shower with the hot water off and the water is still lukewarm. Not super refreshing.
I wanted a frozen treat that would be creamy and satisfy my sweet tooth without being heavy. Cool Whip has a ton of recipes out there so I thought I would try one.
I loved these! Light, refreshing, and just enough sweet to satisfy.
If you don't have Popsicle molds, you can use little Dixie cups with a Popsicle stick.
Hope your summer is going well! Stay cool and enjoy the sunshine :)
Here's to you and your culinary adventures, friends. Cheers!
Raspberry Creamsicles
4 oz cool whip (light, regular, sugar free, whatever suits your fancy)
1/2 cup crushed pineapple
1 cup fresh raspberries
1 small box sugar free instant vanilla pudding mix
Combine cool whip and pudding mix until well mixed. Fold in pineapple and berries. Spoon evenly into popsicle molds.
Freeze at least 4 hours.
To remove from plastic molds- run the mold under warm water for 10-20 seconds to loosen. If you use paper cups, simply peel the paper off.
Saturday, June 23, 2012
BLT Salad
For father's day, my husband and I went to my parents house to celebrate with my dad (and really, with mom too because they are a team).
We spent the day watching Kung Fu Panda 2. Well, Mom and Jon did- Dad and I both fell asleep for a few minutes in the middle. Can we tell who I take after? And we played a spirited game of Clue.
Mom made a BLT salad that is now in my top loved salads. Dad made his special croutons for me using Udi's sandwich bread. He usually makes the croutons with regular hot dog buns but since they are gluten filled that just wasn't going to work for me. Having experienced both versions I can tell you- the gf version can hold its own! They were delish :)
My contribution was churro chex mix. I found the recipe here. It turned out really wonderful, but my cinnamon chips ceased up on the first try. I omitted the butter in the first try because in the past I have had trouble- ironically enough- with it causing the chips to cease.
I ended up giving it a second go and added a drizzle (only about 1tsp for 2 cups of chips) of olive oil to the chips. Upon reading some of the reviews, many other cooks had this same experience.
I am a seasoned cook and I have used a double boiler to melt chocolate for years. There is something different about the make up of cinnamon chips that seems to make them more likely to cease. Next time I make this recipe I will simply use white chocolate chips or almond bark with some cinnamon extract or cinnamon mixed into the chocolate.
All in all it was a great day with family. I am blessed to have two great parents who love and support each other and their families.
Here's to you and your culinary adventures, friends. Cheers!
BLT Salad
12-16 oz bacon
1 head romaine lettuce- rinsed, dried and shredded
2 large tomatoes, chopped
2 cups seasoned croutons*
1/2 cup Kraft olive oil mayonnaise
1/4 cup sour cream
1/4 cup milk
1 tsp garlic powder
salt and pepper to taste
Cook bacon. Cool on paper towels. Blot any excess grease. Crumble and set aside.
In a blender or food processor, combine mayo, sour cream, milk, garlic powder, and pepper. Blend until smooth. Season with salt to taste.
Just before serving combine lettuce, tomatoes, bacon, and croutons in a large bowl. Toss with dressing and serve immediately.
* We used Dad's homemade gluten free croutons but you can use your favorite brand.
We spent the day watching Kung Fu Panda 2. Well, Mom and Jon did- Dad and I both fell asleep for a few minutes in the middle. Can we tell who I take after? And we played a spirited game of Clue.
Mom made a BLT salad that is now in my top loved salads. Dad made his special croutons for me using Udi's sandwich bread. He usually makes the croutons with regular hot dog buns but since they are gluten filled that just wasn't going to work for me. Having experienced both versions I can tell you- the gf version can hold its own! They were delish :)
My contribution was churro chex mix. I found the recipe here. It turned out really wonderful, but my cinnamon chips ceased up on the first try. I omitted the butter in the first try because in the past I have had trouble- ironically enough- with it causing the chips to cease.
I ended up giving it a second go and added a drizzle (only about 1tsp for 2 cups of chips) of olive oil to the chips. Upon reading some of the reviews, many other cooks had this same experience.
I am a seasoned cook and I have used a double boiler to melt chocolate for years. There is something different about the make up of cinnamon chips that seems to make them more likely to cease. Next time I make this recipe I will simply use white chocolate chips or almond bark with some cinnamon extract or cinnamon mixed into the chocolate.
All in all it was a great day with family. I am blessed to have two great parents who love and support each other and their families.
Here's to you and your culinary adventures, friends. Cheers!
BLT Salad
12-16 oz bacon
1 head romaine lettuce- rinsed, dried and shredded
2 large tomatoes, chopped
2 cups seasoned croutons*
1/2 cup Kraft olive oil mayonnaise
1/4 cup sour cream
1/4 cup milk
1 tsp garlic powder
salt and pepper to taste
Cook bacon. Cool on paper towels. Blot any excess grease. Crumble and set aside.
In a blender or food processor, combine mayo, sour cream, milk, garlic powder, and pepper. Blend until smooth. Season with salt to taste.
Just before serving combine lettuce, tomatoes, bacon, and croutons in a large bowl. Toss with dressing and serve immediately.
* We used Dad's homemade gluten free croutons but you can use your favorite brand.
Sunday, June 10, 2012
Oven Tacos
Jon and I enjoy tacos. We like to mix it up with different meats, seasonings, and veggies.
I stumbled on a recipe for oven chicken tacos and thought to myself- how did that never occur to me?! Bake the tacos in the oven- no more tippy tacos when you are trying to fill several of them to serve your family. Brilliant!
The recipe calls for store bought bbq baked beans. I opted to make my own with a cup of canned (drained and rinsed) of navy beans leftover from another night. I simply added some bbq sauce and a little water, simmered them for about 20 minutes until they had thickened up and absorbed the flavors. They turned out wonderfully- in fact, I may make my baked beans this way from now on.
This recipe is great for a family meal or a big shindig since you just bake them in the oven. Easy peasy :)
Here's to you and your culinary adventures. Cheers!
Oven Tacos
Makes 8
2 boneless skinless chicken breasts, cut into strips
1-2 tsp taco seasoning OR 1/2 tsp cumin + 1/2 tsp paprika
8 hard (corn) taco shells
1 cup bbq baked beans, partially drained
1 cup shredded cheddar cheese
4 slices bacon, cooked and crumbled
Optional- sour cream and diced tomatoes
Preheat oven to 400.
Spray a skillet with cooking spray. Cook chicken over medium heat until no longer pink. Add taco seasoning or cumin/paprika and 1/4 cup water. Simmer until thickened.
To assemble:
In a 9x9 baking pan, stand shells side by side. (They were a little snug in my pan, but they stood better that way anyway.)
Fill each taco evenly with the following layers- cooked chicken, baked beans, cheese, and bacon.
Bake for 8-10 minutes.
Remove from oven, allow to cool slightly. Top with tomatoes and sour cream if desired.
I stumbled on a recipe for oven chicken tacos and thought to myself- how did that never occur to me?! Bake the tacos in the oven- no more tippy tacos when you are trying to fill several of them to serve your family. Brilliant!
The recipe calls for store bought bbq baked beans. I opted to make my own with a cup of canned (drained and rinsed) of navy beans leftover from another night. I simply added some bbq sauce and a little water, simmered them for about 20 minutes until they had thickened up and absorbed the flavors. They turned out wonderfully- in fact, I may make my baked beans this way from now on.
This recipe is great for a family meal or a big shindig since you just bake them in the oven. Easy peasy :)
Here's to you and your culinary adventures. Cheers!
Oven Tacos
Makes 8
2 boneless skinless chicken breasts, cut into strips
1-2 tsp taco seasoning OR 1/2 tsp cumin + 1/2 tsp paprika
8 hard (corn) taco shells
1 cup bbq baked beans, partially drained
1 cup shredded cheddar cheese
4 slices bacon, cooked and crumbled
Optional- sour cream and diced tomatoes
Preheat oven to 400.
Spray a skillet with cooking spray. Cook chicken over medium heat until no longer pink. Add taco seasoning or cumin/paprika and 1/4 cup water. Simmer until thickened.
To assemble:
In a 9x9 baking pan, stand shells side by side. (They were a little snug in my pan, but they stood better that way anyway.)
Fill each taco evenly with the following layers- cooked chicken, baked beans, cheese, and bacon.
Bake for 8-10 minutes.
Remove from oven, allow to cool slightly. Top with tomatoes and sour cream if desired.
Subscribe to:
Posts (Atom)
